Conventional or Hydroponic

Conventional or Hydroponic growing methods

Conventional or Hydroponic

Conventional or Hydroponic

So, because I am an old style gardener, then this dilemma has come to me at a late age. Excitingly, though then I have decided to “raise the gauntlet” and take on the challenge of growing hydroponically. Because of the terribly bad cold start to the gardening year then many of us have had to wait patently for the weather to warm up. Here at the end of may the temperature has broken the 20c temperature for the first time in 2021.

So our growing season is on the way! However I must confess to be a composting freque. Indeed keeping worm boxes to produce to feed the worms with our scrap vegetable waste to produce excellent compost. This I have started to use on my citrus and fig plants. Vermiculture, is the name given to this worm farming compost maker. However I digress!

Since starting this blog then I cant fail to be impressed by the number of young people taking up growing.

I say growing and not gardening. Mainly, because of the modern and diverse methods of growing all sorts of things indoors and outdoors. Also I am also impressed by the number of females that are taking up this wonderful hobby and pastime.

YouTube videos offer help and advice for anything and everything to do with growing things. Whatever system you use then the advice is there for all to see. This was the inspiration for starting up my worm farm. The energy given out by the presenters of these videos is sometimes overwhelming and inspirational. Therefore these new growing methods are giving growers and gardeners big decisions about which methods to try. Conventional or Hydroponic !

Although a newbie to hydroponics then I will try and give a breakdown of the advantages and disadvantages of using the hydroponics system.

Hydroponics is a water based system

Basically, a simple description is that hydroponics is plant growing by using water and water based nutrients. So the plants are not grown in soils but other mediums. Of course these other mediums can come in many different things ! Including coco products, rockwool, clay ball pellets, vermiculate and of course perlite. Plants are grown in these types of materials with the use of nutrient solutions to feed and improve growth rate and crop size.

For example I used to grow my tomatoes in grow bags. These grow bags were peat based with added nutrients for the first part of the plants life. After that then I had to manually feed the tomatoes to ensure a good crop. So, this would be both time consuming and also unpredictable due mainly to the weather conditions. Hot weather would mean more watering and more irregular feeding. However always came up with a decent crop by the end of the growing season.

So what now!-Conventional or Hydroponic

Well now that I am experimenting with hydroponics then I do this differently. Hence, my tomato plants are grown in a “Autopot System” as seen in the attached image. Although the initial cost can stretch your pocket the initial outlay can last you years. These systems are made from good quality materials and can be used for many seasons. The growbags are now replaced by a mixture of clay pellets and coco fibre. This medium “Hydrococo” can now be made ready mixed and ready for use.

Combining new and old then I still plant a French marigold with my tomato plants to ward of whitefly and other aphid types. This “companion planting” has worked for me for years now. Of course the Autopot system is fed by a large plastic reservoir. The tank is of course filled when required. Including the addition of nutrients. This growing season then I have been recommended to try out “CX Hydro-Base A and B” by my local Hydrostore shop in Leeds.

My belief is that the whole project is easier without the use of soils or garden composts.

Of course the big winner is that the plants only take up the water and food they require. Also a big bonus is that we can now go on holiday. Without having to ask a friend or neighbour to reluctantly look after your precious plants.

Other growers also use perlite as their preferred growing medium. especially for smaller project. At the moment I am experimenting with lettuce growing in water in plastic boxes<see attached images. of course their progress will be monitored for another blog when the lettuce is ready for eating.

, So to summarise, then researchers have found that your plants will grow 25% faster and produce 30% more growth than soil based growing methods. Importantly, this is because the plants root system has easy access to food and vitamins that ill boost the plants growth. Gardeners can easily control the correct amount of nutrients that your precious plants require. far better than the old individual pots and grow bag systems.

Novice gardeners -Conventional or Hydroponic

In my opinion then novice gardeners should start their new past time/hobby by trying the traditional soil growing methods. However this only applies to people who have a garden or are willing to take over an abandoned or disused allotment (this was by first option at the age of 14). Otherwise, a simple hydroponic system can be set up in the home? Hydroponics do use chemicals so soil gardening can satisfy the people would be the way forward for the more ECO friendly person growing organically.

Finally the choice is your! However as an elderly person then I am already looking forward to my newly found way of growing by using hydroponics supplied online by my local Hydrostore shop here in Yorkshire UK. Finally, like most things in this life , then you pay for what you get.

coco fibre the next gold

Peat to be Banned – For All Plant Growers

Peat to be Banned

Peat to be Banned

So the government in their wisdom have finally decided to put a time limit on the total ban of using peat. Of course peat has been the central material for all growers and gardeners. Especially for the making of compost. In the past few years then garden centres and peat suppliers have been working on a self imposed ban. However, this does not appear to have done the trick. Bowing from the environmentalist lobbies the UK government have decide to impose a legal banning date.

Personally then I am not concerned because other materials that will do the same job ,if not better will be available. First thing to mind is the now well used “Coco” derived from the husks of the coconut during the seeds transformation in to different types of food product. Also better know to the standard gardener is materials. Such as rotted wood-waste, used mushroom compost, composted garden materials or green kitchen waste, leaf mould or well-rotted farmyard manure are more effective and less expensive soil enrichers.

I suspect though that the use of “Coco” is a going to continue as a favourite. So, this replacement is very similar to garden peat. Consequently, Coco fibre is lighter in texture and feels very much a lighter version of peat. Of course as I have mentioned the famous grow media is made from pure coco fibre. Both organic and resourceful. The coco product ensures a perfect air and water retention ratio. Available from all the Hydrostore shops and online the product is part of Canna’s high-performance grow media range. Importantly, which ensure rich root growth and accelerated plant development. Of course every much as good as the now to be banned peat.

Stocking up could be a good idea!

Subsequently, there are many good articles for my readers to digest. About the reasons that stop using peat will do for the planet. Of course, if you believe in this sort of stuff! Personally then I have an open mind about these things. So, as long as there will be good alternatives then perhaps we should not worry too much about it.

So to conclude this important message I think it would be prudent for any large user and supplier of the Coco option to buy plenty of stock in if possible. This ban could go global and I am sure that the world supply of Coco will be stretched to the limit. This will also be a target for Entrepreneurs eager to make a fast buck out of the situation.

I am old enough to remember a sugar crisis and shortages led to rich people filling warehouses with the stuff and making a fortune out of it. Product shortages always lead to inflated prices and I cant see why this wont effect the Coco fibre industry! So watch this space.

is may warming up

Is May Warming Up!

Is May Warming Up!

Is May Warming Up!

So, as I have mentioned many times 2021 has become one of the coldest on record. Importantly, gardeners and all growers of plants need the weather to be warming up as we get into the month of May. Consequently, I am writing this article half way through the month. On checking the 10 day weather forecast then I am over the moon to see that the threat of frost has now subsided.

Although I am still taking caution then I am going to through caution to the wind and get ready for the outdoor plants. Of course , it means in my case that the lemon and orange plants can now go outside for the summer. Therefore my greenhouse can be cleaned out and get ready for my new season tomato plants. I will grow twelve plants down the length of the greenhouse.

12 pot Autopot system

For the second time then this year I will be using the Autopot twelve pot system. My system was purchased online from the Leeds Hydrostore at the start of last years growing season. However last years weather was totally different to this miserable cold year. We were at the start of lockdown and the weather was scorching hot. Just the start that us growers require for a good start. Of course this year will be different. Especially outdoor growers where the soil is still very cold!

Fortunately, I have a greenhouse, providing early heat by using an electric greenhouse heater. So, as a growing medium then this year I will try “CANNA Coco Pebble Mix“. Last year I mixed my own so this year I will try the ready mixed, mainly because it should be a little easier and time saving.

As you can see in the image that my pots are all set out and connected to the water tank to check that the water flows into the system correctly. In the background the plants are all waiting to be planted. This year I was going to grow some American varieties such as “Kellogg’s breakfast” . However, because of the lower temperatures early on then I have decided to stick to varieties to grow in lower temperatures. This attached link “cold weather tomato varieties” gives a good list of some of these varieties.

I could go for the well known tomato varieties.

Of course I will keep my readers informed and which plants I eventually decided to grow. Mind mind is still swinging towards some of the more common and well tried varieties such as Money Maker, Alicante and Ailsa Craig. Also Beefsteak varieties are now popular and I will grow a few of these.

Finally one of the reasons that I decided to go with the “Autopot ” system. Of course, was that my plants will still be fed and watered, if I need to take a short break. In the past then I found it difficult to go away and find someone to look after plants correctly.

strawberries

Growing Strawberries using Hydroponics

Growing Strawberries using Hydroponics

Growing Strawberries using Hydroponics

This time of year is synonymous with growing sweet, ripe and succulent strawberries. In my opinion it probably the most liked fruit in the UK. So, it is certainly mine and I have already started the ball rolling by buying some bare rooted plants from the famous Scottish fruit growers “Ken Muir“. Strawberries come in a few different varieties, which are Early Midsummer, Midsummer, Late Summer, and perpetual.

So ,I am growing some mid and late summer varieties for a little variation. I must confess that I will be splitting the growing methods this year. Bare rooted plants should be planted as soon as the arrive from the growers. Subsequently, then I planted the bare roots on arrival in individual three inch pot. The pots were squeezed into a space in my heated greenhouse. Since then they have now started good growth and are at the moment outside hardening off.

This year however will be a bit different. So I will wash the roots off and grow six plants using the hydroponic system. of course the rest will be planted out using the more conventional soil method in a wooden crate.

Quicker fruiting expected in Hydroponic system

According to my reading then strawberries will produce fruit much quicker when grown hydraulically. I am looking forward to my experiment and am also thinking that the fruit will be kept cleaner and free from the dreaded slugs. So, The ones grown in the wooden crate will require protection from the fruit being splashed. like all my experiments the I will keep the readers of my blogs informed.

Excitedly, I believe that strawberries can be grown throughout the year using a heated facility along with lighting equipment. So, I should have enough room in my heated greenhouse to try this out. I can root cuttings the the many runners that strawberries produce in any growing season.

Although, it looks like the strawberries require any special attention then it is worth a mention about the plants crown. So, when planting strawberries you must not plant them too deeply. The plants have a crown which must protrude above the growing medium whichever method of growing that may be used. Consequently, if planted too deeply then the strawberries can become susceptible to root rot and botrytis and quickly die off.

Finally, growing pots and air pumps can be purchased online or collected from your Hydrostore Wakefield branch.

growing the Kratky system

The Kratky system

The Kratky system

The Kratky system

So here we are at the beginning of May 2021. This is important to me because it is my birthday on the 6th. Consequently, I can also remember the weather in that particular week. Traditionally the early may weather is hot and sunny. Unfortunately, according to the forecasters then this year will be much different. Frustratingly, we have just survived the coldest April since 1922 and as growers and gardeners then dont we know it !

Gardening, techniques include having to move things about to fit other things into. As I look out of my office window the weather is dreadful! Heavy rain and windy making it feel very cold. Unfortunately, my citrus plants are holding up my circle of planting. So, when my citrus goes outside then my hydroponics grown tomatoes can go in. Because of the cold then I am about three weeks behind this year.

With past experience then I realise that the weather can catch up over night! Lets hope so. So, as I have written in some of my earlier posts then I am really looking forward to growing by using one of the Kratky methods.

Who was Kratky ?

Kratky was a guy studying in the “University of Hawaii“. B.A.Kratky discovered a method of growing plants by using “Deep Water Culture“. Subsequently, his simple system would be used without the use of an electric pump. So making the growing system simple and easy to use. His growing method was simple and easy to use, developing into perhaps six split off systems. So, making growing plants possible in all situations. Including growing indoors with the aid of grow lights .

However the actual system of hydronic growing came from a succession of people experimenting in soilless growing conditions up to the emergence of Professor Gericke. Professor Gericke experimented at the University of California” in the 1920’s and 30’s. By growing tomatoes in commercial sized buildings. His experimentation lead to the growth of tomato vines growing to twenty five feet long. Of course by not using soil but water and a mineral nutrients solution. In 1937 prompted by a phycologist (W A Setchell) he introduced the name of the new growing system as water culture and hydroponics.

Of course the system moved forward at a rapid pace up to the huge amount of technical aid now used in hydroponics and its derivatives. Of course the Kratky system is perhaps the basic way of growing . Requiring no electrical aids. However, because the system doesn’t use any form of aeration then problems can occur with temperature spikes. Say if the weather gets very hot the solution can become stagnant with blooms of algae growing in the solution mix.

Air pump the solution for algae growth

The obvious solution to this is to add an air pump into the system. This added air will oxygenate the growing solution. Importantly, the plants roots will have a good access to oxygen. Accordingly, the pumped air will regulate the temperature of the growing solution cutting the levels of any algae growth due to heated stagnation. So, I will adding a small aquarium pump to oxygenate my hydrotropic tanks (As soon as the weather warms up ) .

So, at the moment I have collected my plastic boxes and mesh pots to start my salad growing hydroponics system to kick off and cant wait!

All equipment can be purchased in the York area from Hydrostore York.

BioGreen Products

BioGreen Products

BioGreen Products

BioGreen Products

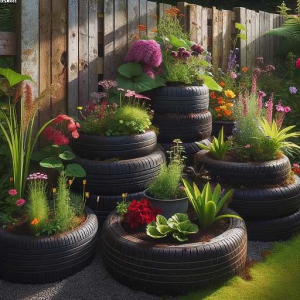
When I require anything for my own personnel use when gardening then I visit my closest Hydrostore which is the Leeds store very closely followed by the Wakefield store. Importantly all the Hydrostore shops offer a great range of products for all types of growing whether indoor or out doors. So, on my first visit to the Leeds store then I was amazed at the quantity of different products that are available to the growers of almost anything.

Indeed the shelves were full of exotic sounding nutrients and plant foods. Of course there were many familiar things for sale that are used by most gardeners. As I have said then I was amazed by the selection and have taken up to challenge myself! This is to learn and write more about the wealth of products on offer to all kinds of gardeners.

Starting off with the BioGreen Range

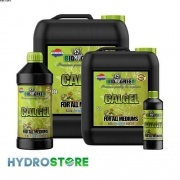
I will be starting off with the BioGreen products. Simply because I like the particular design of the product labels along with the little green tree frog on the image. Interestingly, the BioGreen product range of nutrients offers a choice of two base systems. Including three optional supplements and six additives. Probably making this an easy system to use whilst at the same time giving the plants a top class nutrient to thrive on.

Looking at the product, I can see that the mixing method is not going to be as complicated as other brands of similar things. While browsing I did notice that some brands had many different bottles claiming each one was a benefit to maximum plant growth and development. However, BioGreen look to have simplified this by development their products with quality in mind.

Many plant compounds cannot be blended

As we know plants require many different compounds! These could include, many things such as Mycorrhizal Fungi and Rhizobacteria, Carbohydrates, Amino acids, Vitamins and many types of enzymes. So the clever scientists at the BioGreen labs have come up with a streamlined method of adding many of these things into their product range. Due to an excellent line up to cover all the necessary ingredients.

Of course “BioGreen Grow 1” is a high-quality NPK based fertiliser specifically developed to maximize your plants’ genetic potential during the vegetative and early flowering stage. Therefore this top quality fertilizer can be used for most types of plants. So, to enable a good start with maximum root growth then “Grow 1″contains enough phosphorus to initiate explosive root formation, giving the new plants a great start to life.

Like all types of nutrients please follow the instructions for the correct dosage. Importantly, as with many types of nutrients, it’s best practise to offer it in gradually increasing doses. Of course I will be trialling it on some of my hydroponic growths. So I will probably apply daily by using my plastic water tank. Urgently, like most other chemical fertilizer products, always be careful not to overdose!

BioGreen Bloom 2

So, this excellent product. BioGreen 2 is also a suitable fertilizer for use in all soil types and hydroponic use. Containing many of the micro and micro -nutrients required for full top growth and flowering of your plant. Of course this product is best switched to when the plants reach the flowering stage. This product is made from the purest materials and is totally taken up by your plants.

Because, BioGreen Bloom 2 visibly improves the condition of the flowers and fruits and helps instigate an explosion in blooming. I cant wait to start using this on my citrus trees to improve blossoming and fruit set. This product is available in Availability: 250ml, 1ltr, 5ltr and 10ltr size bottles.

BioGreen Hydro A+B

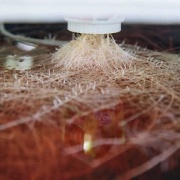
Thirdly we have “BioGreen Hydro A&B” is a two-part base nutrient made for use from the start of the vegetative phase until the end of the flowering stage. The product also comprises a wide range of micro and macro-nutrients for strong plant development. I am used to using A and B mixes from my experience in using a similar product on last years greenhouse tomato crop, producing excellent size fruit with a plentiful supply. As with many such products it is best practise to add “part A” to the water tank first mixing very well before adding the “part B” and also mixing the solution very vigorously.

  1. The product is a two-part base nutrient. Part A comprises an NPK ratio of 4.3-0-0. Part B has an NPK ratio of 0.6-5.2-5.7;
  2. The formulas are made for the vegetative stage and the flowering stage;
  3. The product is suitable for dripper and irrigation systems;
  4. It’s designed for all growing medias

BioGreen Supplements

BioGreen X-Rooting is a highly concentrated organic root stimulator containing humic acids, minerals and beneficial bacteria. Helping to preserve and balance the plant’s metabolic processes. Thus increasing the absorption of mineral nutrients by improving nutrient uptake.

BioGreen Calmag

Calmag is a high quality fully soluble additive containing a high dose of nitrogen, calcium and magnesium. Enhancing, the quality of your water and are essential to stimulate plant growth. Hence, from early vegging right through to the flush.

BioGreen PK 13/14

BioGreen PK 13/14 is of course is a highly effective potassium and phosphorus additive. Supporting, the plants during the critical stages of flowering

BioGreen X-Blast

So, “BioGreen X-Blast” is a highly potent late-flowering PK additive. Creating, maximisation of your plant’s performance during the final flowering phase. Specially, designed to push the plant to its full potential. 

BioGreen Biozym

of course, “BioGreen Biozym” is a high-quality enzyme additive. Naturally, made up of 24 main enzymatic complexes. Importantly, different coenzymes have also been carefully added. Encouraging high rates of enzymatic activity. 

Hydrostore-BioGreen Products- BioGreen MAM

Firstly, “BioGreen MAM” is a high-quality one-part fertiliser. So, containing, all the required macro and microelements. Required to maintain healthy mother plants from which cuttings are constantly taken from. Cant wait to try this on my Lemon tree cuttings.

Hydrostore-BioGreen Products-BioGreen Garlic

Consequently, “Biogreen Garlic” is obtained through a well-thought-out two-step production process. Consisting by placing fresh cut fermented garlic bulbs and ginger in tanks without oxygen. Leaving the mix for several months (polar extraction). Finally, followed by the a-polar extraction.

peppers

Beginner Peppers

Beginner Peppers

Beginner Peppers

Hi here is my second Hydrostore blog for the month of April 2021. Once again there are many things that I am learning on my into the world of growing without soil, hydroponics!

So if tomatoes are my favourite salad crop then peppers are certainly my second. Peppers provide a massive variety of colours and flavours. Of course from the red hot chili peppers such as “Scotch Bonnet” to the milder bell peppers that we use in regular salads. So some of the hotter peppers grown do in fact require hotter temperatures to grow them. Here in the North of England it depends on the type of summer that we are experiencing!

The spicy peppers are used mainly for cooking spicy dishes and are popular for spicy Indian dishes and West indian cooking. Of course we can buy a spicy pizza covered in spicy hot peppers if we like that kind of thing. However I generally stick to the mild flavoured bell peepers that come in many shapes and colours. Most peppers start off as green coloured fruit and later turn into the colour of choice. Hence, from bright red to yellow and even dark purple. Of course all these colours add brightness and colour to a great mixed summer salad! My mouths watering as I am writing this!

Try growing peppers the hydroponics method

Peppers are easy to grow and only suffer the usual pests. White fly and other aphid species are the general worst enemies. These can be controlled by the usual methods of spraying with soapy water or using a commercial brand such as “plant magic” bugicide from your local Hydrostore online, in different sized containers. So, a good way of determining the colour of bell peeper to grow is to buy one in your favourite colour. Say in this case yellow. The seeds can be removed and generally the plant will turn out to be the same colour as the parent plant, in this case yellow.

This year I am going to try germinate the seeds using the paper towel method. This is a popular way of germinating many plant species. Including peppers and tomatoes. The seeds are carefully wrapped between two lairs of tissue paper and placed in a saucer of water. The paper must be kept wet and not allowed to dry out!

The seeds will eventually germinate and small green shoots will appear. So, these small plants will then be placed singularly inside of a rockwool cube. Always try to handle the seedling with great care. The rockwool is then to be placed inside a 3ins net cup. It is important to buy net cups with a lip around the top so that it fits snug inside the plastic tanks lid. Incidentally, I will be growing four pepper plants inside my 18×15 ins black plastic tanks (Totes) .

The tote lids have four holes cut in to take the 3 ins plastic net cups. I will then add “nutrients” into the water and place the cups and pepper plants into the tank lid and therefore the tank of water. In my case it will be CX hydrobase. So, I will be trying this out for the first time and will keep my readers up to date with the results. I shall also be using a small aquarium pump to circulate oxygen to the plants via the tanks water supply.

My set up will be in my greenhouse once the weather warms up. There will be plenty of light at this time of year! Of course this method can be used indoors by adding a LED lighting unit to your growing kit.

Cherry Tomatoes

Long Winter in 2021

Long Winter in 2021

Long Winter in 2021

So, this year has been a long cold winter. Especially for us growers who should be getting growing around this time of year. My own situation is that I have a heated greenhouse for my citrus trees. However it is too cold to move them outside onto a sheltered spot. Moving them gives me space to plant out my seedlings and prepare for the tomato plants into their final planting spot.

Accordingly, I have not yet planted my seeds and realise that I am running out of time. This year I have decided to try some different seed varieties. I love to grow the big size tomatoes that are generally very tasty and a good choice for summer salads (Thats if we get a summer this year?)

I am a great fan of watching “YouTube” videos and I think they offer some great advice. Especially the different choices of tomato seeds that I have never heard of before.

Kellogg’s Breakfast and F1 Super Mama

This year I will be trying five different varieties from Nickys Seeds. Consequently these will include the much raved about Kellogg’s breakfast and another heirloom variety the F1 Super Mama.

These seeds will be planted this time by using the soil-less method of “Rockwool Blocks” . These are only £7.50 for 150 blocks to sow your seeds into. Of course the seeds are then placed into the blocks singularly. Hence they are then covered with a small quantity of “vermiculite“. Vermiculite, can be bought in small or large quantities. However I prefer to buy the larger bags because this is something that is important when growing hydroponically.

The blocks are always to be pre-soaked before placing one seed in the centre hole. Some growers advise placing two seeds and then selecting the strongest seedling when they have germinated. However these seeds are very expensive any you only get ten seeds per packet. So to me you should just plant a single seed. The blocks are then placed into a tray of water until germination. I prefer to use a heated propagator unit for better results as long as the area where the seedlings will be grown on is also heated.

Dont forget the in this weather then rooms in houses can become very cold without any form of heating. I am sure that there will be growers pout their who have made this mistake in the past. Losing plants due to stress because of a drop in temperature in the middle of the night. When the seedlings have germinated they can be grown on to whatever system you prefer.

Auto Pot System

This year I am going to grow my larger crops using a flexi water tank that feeds an Autopot system . These systems come in many sizes but the nine pot system is ideal for my space in the greenhouse.

Once the system is set up it just a case of training your plants as they grow, (I prefer to use large canes). Water tank levels must be watched with the added A and B nutrients also added to the correct dose. This year I will try out CX Hydro base from Canada. So, when your plants start to grow you must remember to taking out any side shots, between the stem and the main branches.

Also remove any dead leaves and give the plants plenty of room to grow flowering buds for a good crop. All the products necessary to grow a good crop most plants are available online from “Hydrostore” in West Yorkshire.

rockwool germinating cubes

Starting my Seeds in Rockwool

Starting my Seeds in Rockwool

Starting my Seeds in Rockwool

As I write this post we are at the back end of March 2021. The winter here in the North of England has been on the cool side with the odd milder day. Much different to last year when we had only a couple of frosts in the whole of winter! Even my outside “Basjoo Banana” plant survived with some of its leaves in tact.

However as I have said this winter was to be much colder. As you probably know then I have been growing most things all my life. Including, my favourite fruit the tomato’s. Now in my later years then I am trying out more difficult plants to grow and perhaps survive the English winter. Including, pot grown figs, lemons and other types of citrus trees and pomegranates.

The secret is keeping them over wintered!

Introduction to Hydroponics

My son in law works for a local Hydroponics store and since then I am becoming fascinated by the hydroponics method of growing things such as salads and herbs. This also includes tomatoes, of which I have successfully grown a full crop in the last growing year. So, this year will be my very first venture growing some different lettuce types starting of with rockwool cubes to germinate my seeds.

Rockwool is the stuff that is used in loft insulation to insulate our homes from the cold and is made out of highly heated molten rocks. This sounds strange but the rocks are heated until they melt and the resulting molten rock is spun to make the wool type threads. I suppose that it must look like molten volcanic rock when flowing down a volcano!

In fact it was first discovered around 1850 on the “Mauna Loa Volcano” on the island of “Hawaii”. Importantly, the use of rockwool for insulating buildings was first used in 1935.Followed by other uses including a great product for growing seedlings.

Rockwool stores water and oxygen

So, the rockwool cubes that we buy to start off our seedlings are perfect because they store enough water while providing oxygen to the newly planted seeds. Of course here in the UK we have just put our clocks forward for British summer time and the growing season “begins in earnest”. This week will bring our first daily temperature of over 20c. I cant wait to get started with my first ever planting of lettuce seed in the rockwool cubes. The ones I purchased were the SBS Grodan Cubes. So these cubes are 1.5 by 1.5 blocks in a 77 plug tray. Perfect for my requirements.

The cubes look a perfect size to me but you can cut them up smaller if you want t save money. I bought mine from the local “Hydroponics store” in nearby Wakefield. Before the seeds are sewn I will soak the correct number of plugs in water for a few minutes, before draining them after the soaking for a further 15 minutes. This gets rid of any excess water there may be in the plugs (cubes).

Sowing the seeds is just the same as in any sort of growing medium! A little tricky depending on the size of the seed, especially tiny lettuce seeds. I would normally just scatter lettuce seeds onto a tray of compost and then prick out the newly grown seedlings. However by taking a little time once the seeds are placed in the centre of the plugs then there is no need for any pricking out the seedling and causing the plants to stress.

Using a cocktail stick

Tiny seeds such as lettuce can be spread out on a piece of tissue paper for better observation and easier handling. So, I am then going to use a tooth pick or cocktail stick (Same thing), to ease a seed into the hole in he centre of the rockwool plug. When the seeds are all positioned then I will spray with a little water to moisten the seeds. I will then place a little “vermiculite” on top of the plug hole to seal the seeds inside.

The next stage will be to place the seeds in a tray and in a propagator for germination and then onto the next stage which I will cover in the next blog. The propagators come in many shapes and sizes and are available online at your local Hydrostore here in Yorkshire UK.

Growing Hydroponics Refresher

Growing Basil

Growing Basil

Home » Blog

Growing Basil

So basil is an important herb that we now use in many types of cooking. Unfortunately, I must confess that I not a fan of this important plant. During my learning curb of growing by using hydroponics systems then it is probably the most important herb to grow!

There are many different types of basil plants that can be grown. However I think the main ones are >

  1. Sweet Basil
  2. Genovese Basil
  3. Thai Sweet Basil
  4. Purple Basil
  5. Lemon Basil
  6. Lime Basil
  7. Lettuce Basil
  8. Spicy Basil

So lets get on with the growing of these plants using the hydroponics method. Firstly, they can be started off in two ways! Of course by germinating seeds and secondly by taking cuttings from established plants. Of course for first time growers then seeds are the best option. However if cuttings are available then they can be rooted within a week.

Basil should be grown indoors or in a greenhouse. Because, they are a warm climate plant. So 16 to 25 Celsius would be the best temperature to get good results. When using the hydroponics system then the best start would be to use “rockwool blocks“. Seeds can be sown in the blocks without having the need for transplanting. Other mediums can of course be used ! Including perlite, vermiculate, coco coir and peat moss. However peat moss is becoming more unpopular here in the UK. Methods of digging the peat out of the ground are a concern to conservationists.

All these growing mediums are available online from your local “Hydroponics website”.

Fungus a problem to young basil plants.

Whichever way you propagate the young basil plants then they should be grown on using a traditional hydroponics system. However another important point is that basil seedlings are susceptible to attacks from the “Pythium fungus”. As in my other posts then it is important keep your growing area and equipment as clean as possible. Sterilisation is very important and Pythium is a substantial threat to your newly grown seedlings.

Growing areas should be warm but well ventilated. This applies to many crops grown in warm conditions and indoors. Canadian Xpress Wilt Guard, is a great product that can be used to prevent Pythium and other fungal disease found in the plant growing world.

So, after treatment the plants can be moved onto plastic mesh pots and inserted into appropriate growing medium of your choice. Basil grows very well using the hydroponics system. I must confess that I have found basil difficult to grow using normal soil based methods. Consequently, I have in the past give basil a miss. However, I am looking forward to my first attempt growing these herbs in a soilless way using hydroponics.

Finally, the best way to harvest basil is to clip off the top two thirds of the leaves for kitchen use. Importantly, new growth comes from the base of the plant, similar to say spinach or broccoli. However cutting basil for kitchen use should be restricted to say three times but this will give you more than enough basil for normal usage.

As a visual person then I think its great to look at a good video. So here is one about basil.