rockwool germinating cubes

Starting my Seeds in Rockwool

Starting my Seeds in Rockwool

Starting my Seeds in Rockwool

As I write this post we are at the back end of March 2021. The winter here in the North of England has been on the cool side with the odd milder day. Much different to last year when we had only a couple of frosts in the whole of winter! Even my outside “Basjoo Banana” plant survived with some of its leaves in tact.

However as I have said this winter was to be much colder. As you probably know then I have been growing most things all my life. Including, my favourite fruit the tomato’s. Now in my later years then I am trying out more difficult plants to grow and perhaps survive the English winter. Including, pot grown figs, lemons and other types of citrus trees and pomegranates.

The secret is keeping them over wintered!

Introduction to Hydroponics

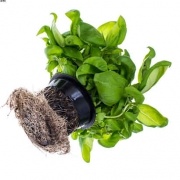
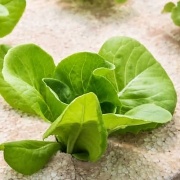
My son in law works for a local Hydroponics store and since then I am becoming fascinated by the hydroponics method of growing things such as salads and herbs. This also includes tomatoes, of which I have successfully grown a full crop in the last growing year. So, this year will be my very first venture growing some different lettuce types starting of with rockwool cubes to germinate my seeds.

Rockwool is the stuff that is used in loft insulation to insulate our homes from the cold and is made out of highly heated molten rocks. This sounds strange but the rocks are heated until they melt and the resulting molten rock is spun to make the wool type threads. I suppose that it must look like molten volcanic rock when flowing down a volcano!

In fact it was first discovered around 1850 on the “Mauna Loa Volcano” on the island of “Hawaii”. Importantly, the use of rockwool for insulating buildings was first used in 1935.Followed by other uses including a great product for growing seedlings.

Rockwool stores water and oxygen

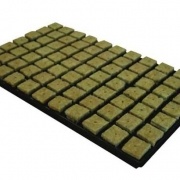
So, the rockwool cubes that we buy to start off our seedlings are perfect because they store enough water while providing oxygen to the newly planted seeds. Of course here in the UK we have just put our clocks forward for British summer time and the growing season “begins in earnest”. This week will bring our first daily temperature of over 20c. I cant wait to get started with my first ever planting of lettuce seed in the rockwool cubes. The ones I purchased were the SBS Grodan Cubes. So these cubes are 1.5 by 1.5 blocks in a 77 plug tray. Perfect for my requirements.

The cubes look a perfect size to me but you can cut them up smaller if you want t save money. I bought mine from the local “Hydroponics store” in nearby Wakefield. Before the seeds are sewn I will soak the correct number of plugs in water for a few minutes, before draining them after the soaking for a further 15 minutes. This gets rid of any excess water there may be in the plugs (cubes).

Sowing the seeds is just the same as in any sort of growing medium! A little tricky depending on the size of the seed, especially tiny lettuce seeds. I would normally just scatter lettuce seeds onto a tray of compost and then prick out the newly grown seedlings. However by taking a little time once the seeds are placed in the centre of the plugs then there is no need for any pricking out the seedling and causing the plants to stress.

Using a cocktail stick

Tiny seeds such as lettuce can be spread out on a piece of tissue paper for better observation and easier handling. So, I am then going to use a tooth pick or cocktail stick (Same thing), to ease a seed into the hole in he centre of the rockwool plug. When the seeds are all positioned then I will spray with a little water to moisten the seeds. I will then place a little “vermiculite” on top of the plug hole to seal the seeds inside.

The next stage will be to place the seeds in a tray and in a propagator for germination and then onto the next stage which I will cover in the next blog. The propagators come in many shapes and sizes and are available online at your local Hydrostore here in Yorkshire UK.

Growing Hydroponics Refresher

Growing Basil

Growing Basil

Home » Archives for March 2021

Growing Basil

So basil is an important herb that we now use in many types of cooking. Unfortunately, I must confess that I not a fan of this important plant. During my learning curb of growing by using hydroponics systems then it is probably the most important herb to grow!

There are many different types of basil plants that can be grown. However I think the main ones are >

  1. Sweet Basil
  2. Genovese Basil
  3. Thai Sweet Basil
  4. Purple Basil
  5. Lemon Basil
  6. Lime Basil
  7. Lettuce Basil
  8. Spicy Basil

So lets get on with the growing of these plants using the hydroponics method. Firstly, they can be started off in two ways! Of course by germinating seeds and secondly by taking cuttings from established plants. Of course for first time growers then seeds are the best option. However if cuttings are available then they can be rooted within a week.

Basil should be grown indoors or in a greenhouse. Because, they are a warm climate plant. So 16 to 25 Celsius would be the best temperature to get good results. When using the hydroponics system then the best start would be to use “rockwool blocks“. Seeds can be sown in the blocks without having the need for transplanting. Other mediums can of course be used ! Including perlite, vermiculate, coco coir and peat moss. However peat moss is becoming more unpopular here in the UK. Methods of digging the peat out of the ground are a concern to conservationists.

All these growing mediums are available online from your local “Hydroponics website”.

Fungus a problem to young basil plants.

Whichever way you propagate the young basil plants then they should be grown on using a traditional hydroponics system. However another important point is that basil seedlings are susceptible to attacks from the “Pythium fungus”. As in my other posts then it is important keep your growing area and equipment as clean as possible. Sterilisation is very important and Pythium is a substantial threat to your newly grown seedlings.

Growing areas should be warm but well ventilated. This applies to many crops grown in warm conditions and indoors. Canadian Xpress Wilt Guard, is a great product that can be used to prevent Pythium and other fungal disease found in the plant growing world.

So, after treatment the plants can be moved onto plastic mesh pots and inserted into appropriate growing medium of your choice. Basil grows very well using the hydroponics system. I must confess that I have found basil difficult to grow using normal soil based methods. Consequently, I have in the past give basil a miss. However, I am looking forward to my first attempt growing these herbs in a soilless way using hydroponics.

Finally, the best way to harvest basil is to clip off the top two thirds of the leaves for kitchen use. Importantly, new growth comes from the base of the plant, similar to say spinach or broccoli. However cutting basil for kitchen use should be restricted to say three times but this will give you more than enough basil for normal usage.

As a visual person then I think its great to look at a good video. So here is one about basil.

Grey Mould Problem

Hydrostore-Grey Mould Problem ?

Grey Mould Problem

Home » Archives for March 2021

Grey Mould Problem

Of course the first time that I can remember this problem was when I was rooting my first Chrysanthemum cuttings. Coincidently, it was also in my first greenhouse. Although still a teenager I rented my first allotment which was next door to my local park in Dewsbury ,West Yorkshire. So, I was always careful with my money and indeed had a paper round in the morning and also the evening.

Of course this enabled me to pay the yearly rent on my first allotment. The cuttings were given to me by a vey kind allotment holder who has now passed away. Mr Grimes was also the local council swimming instructor in the Dewsbury area. So, Mr grimes was the king of growing all sorts of things including dahlias and chrysanthemums. My first job was to clear the overgrown allotment area including my newly acquired and rather old greenhouse.

Ventilation became the problem

Grey Mould is technically known as ” Botrytis Cinerea” . Hence grey mould is a type of fungus and can spread very quickly if not spotted early. The mould is more rampant in humid and warm growing conditions. Going back to my youth! Mr grimes kindly gave me a selection of chrysanthemum cuttings to try and root myself. So, the last user of the greenhouse had left some good and useful things including seed boxes and smaller things such as plant labels.

This was all to become useful as money was not available form my parents in those days ! Everything had to be earned. Hence my two paper rounds. After looking up “rooting cuttings” in my old and tattered gardening book. Then I filled two wooden boxes with peat and placed in the prepared cuttings using a good quality peat. This was the main medium that all gardeners used in those days. Most growers now use “Coco” as a growing medium, due to environmental considerations.

However I digress! So my greenhouse was not heated, (because I could not afford) . Consequently, the days were warm and the nights cooler. Unfortunately for me this encouraged the growth of grey mould on my newly acquired cuttings. Eventually, I lost the lot, but this was a lesson learned!

Ventilation was the lesson learned. This old greenhouse had a window that opened but could not now be used because of age. Modern plant growers have a wealth of equipment to stop grey mould from attacking your valuable plants. Whether indoors or in a greenhouse then good ventilation is a must. “Prevention is better than a cure”. Here at Hydrostore we sell a large selection of fans and ventilation extractor fan systems.

Good ventilation the best practice

So, lights and heaters can cause the humidity that grey mould thrives on! My latest greenhouse (fifty years later) has many top openings and side vent systems. Even so I will have an electric fan in place for high temperatures or thundery clammy weather. When growing using hydroponics systems there is a good amount of water involved. So once again good ventilation is a must. In humid conditions the grey mould can spread very quickly.

The mould can also hide on non-growing items just ready to spread into your valuable flowers and fruit. Good cleanliness in the growing area is also a must. As I have mentioned, fans and dehumidifiers are available from you nearest “Hydrostore” here in West Yorkshire.

rrey mould thrives on environments that are to humid and quickly spread from plant to plant and often to non plant items to, its especially common in the very early stages or the d flowering stages if the humidity is to high and you have a lot of dense flowers and fruits that the old loves to hide in. A great product that can be used is “canna cannazym“. Please read the instructions carefully for the best results.

Just as a footnote then grey mould is common on grapes and can be clearly seen on the attached image.

Hydroponics from the Start

Hydroponics from the Start-Beginning with growing lettuce.

Hydroponics from the Start

Home » Archives for March 2021

Hydroponics from the Start

Hi as an older gardener then I have to give some thought into starting off with hydroponics. So, its hard to get into my head that you dont need soil or indeed a garden to grow things. My first hydroponics venture came with growing tomatoes. However this was done by using “clay pebbles” and a Canna Coco Natural. Of course this is a well known grow media. A replacement for growing in peat moss and made from pure coco fibre. As a result I now use this product for all my plant growing needs. The product ensures a perfect air and water retention ratio. It’s is made by Canna from its high-performance grow media range. Ensuring rich root growth and accelerated plant development.

However, I am now going to try to use pure hydroponics to grow my first lettuce plants. So, my first thought was that I could control the actual lettuce plants that I need. I dont know about you but previously I am a victim of over growing my salad crops. Consequently I will feel more positive about only growing the amount of salad crops that will be required. I can plant out as many lettuces that I will need to last me a few weeks and then replant a second tray. Of course if it is required.

Herbs can also be a good crop to grow.

This method also looks good when growing certain herbs as well as different lettuce types. However I want to cover this in a separate blog post! lettuces grown in a plastic tray and a polystyrene sheet cut out to fit the young lettuce plants in side a mesh pot with a lip so that it fits into the hole perfectly. So the tray is then filled with water up to the root system of your lettuce plants.

Importantly, the you will have to add nutrients to the water to feed the fast developing plants. My local hydroponics store has recommended that I try “CX Hydro-base” mixing part A and part B to the correct quantities. of course I will be trying this in the second week of March in my slightly heated greenhouse. Light should be no problem! Of course you can also use some sort of solar lights for indoors growing.

Also I believe that I should also use a small air pump for oxygenating the you plants. I have seen in tests that this vastly improves the plants growing capabilities. Consequently, this is an extra expense but the pump can be used over and over again.

Asa visual person myself I have decides to add a good video about the early learning days for growing with this hydroponics method, please enjoy!

Hydrostore-Potassium

Hydrostore-Potassium

Hydrostore-Potassium

Home » Archives for March 2021

Hydrostore-Potassium

Of course Potassium is the third important nutrient in my list. This element helps your precious plants to move and form sugars, starches and oils in plants. Thus increasing the plants vigour and also helping in warding off diseases. The correct dose of Potassium will also improve your plants fruit and flower quality.

Certain soils are devoid in this element. Notably, sandy types of soil. Potassium can also become deficient in soils that are over grazed and also where plants are grown in intensive cropping. A good example of this is the growing of banana plantations.

Potassium has many plant benefits

Including the regulation of opening and closing the stomata, thus regulating Co2 uptake. This of course occurs in “Photosynthesis”. I try not to be too technical potassium will trigger the activity of ATP (Adenosine Triphosphate).

ATP is a very important source of energy stimulating chemical processes within the plant. Yet another major role of potassium is the regulation of the plants water take up. Importantly, through the plant roots and also water loss through the stomata. Potassium is also known to improve the plants drought resistance.

Many growth enzymes are also activated by Potassium.

Alg·A·Mic is a revitalising product that contains a low level of NPK (Nitrogen, Phosphorus and Potassium) – making it impossible to overdose.

It can be added to every substrate during the flowering and growing period. Of course like most plant growers then nutrients could be a little difficult to understand! However most producers of the chemicals make it easy and your local Hydrostore are always there to help.

phosphorus

Hydroponics-Phosphorus

Home » Archives for March 2021

Phosphorus

Of course, phosphorus enables a better root and flower growth for your precious plants. Importantly, it also helps your plants cope with certain environmental stresses. Thus phosphorus is an essential part of growing heathy and vigorous plants. Starting with the roots, then Phosphorus is well associated with healthy root development. Plant stalks and stems are increased due to this element. Flower formation is well improved and increased seed production.

So, phosphorus enables your improve your plants quality. Enabling early crop maturity and a better resistance to plant diseases. Generally this element will give your plants support throughout its entire life. A good article can be seen on the “https://www.easy-grow.co.uk/diagnosing-phosphorus-imbalances-in-hydroponics/” web site.

There are a few different methods of giving your plants Phosphorous.

 So, one of the commonest is the turning of “Rock Phosphate” into “Phosphoric Acid”. This process allows your plants to take up the phosphorus into the root system. This is a good way of giving your tomato plants a good start. So, by sprinkling some Rock Phosphate into the bottom of your tomato plant pot before introducing the plant. Importantly, this will give your tomato plants root system good development and a great start in life. 

Other organic sources of Phosphate include “Bone meal”!

Bone meal will release the phosphate to the plant in three to six months’ time. Other products are available so its well worth seeing what’s available in your area.  

Of course there is a few alternatives to rock phosphate! Including “superphosphate” and as already mentioned, bone meal. So, a good deal of the world’s rock phosphate comes out of North America. After further chemical treatment it then becomes known as superphosphate. This product is soluble in water. Rock phosphate like rock potash is very slow in action and the conversion from insoluble phosphate to the soluble form is almost negligible. It does contain trace elements and a single application will remain active for some years, best applied early in the Autumn or Winter to be effective by the next Summer. 

Of course there are many products available with a higher phosphorus level from your local Hydrostore shop. Finally, this is also very important in hydroponics growing systems.