This set of blogs looks at the number and potency of pests that growers may encounter indoors or outdoors.

Hydrostore-Friendly Bugs-ladybird

Friendly Bugs-ladybird

Home » Plant pests

Friendly Bugs-ladybirds

Friendly Bugs-ladybirds

I must confess that this is one of the great and important parts of gardening and growing plants in general. Knowing that many of these little blighters that try to ruin our crops have a natural enemy These little predatory insects have one aim in life! to set out and destroy the very pests that we dread every growing season. Knowing who your little friends are will help you protect your precious plants during the growing season.

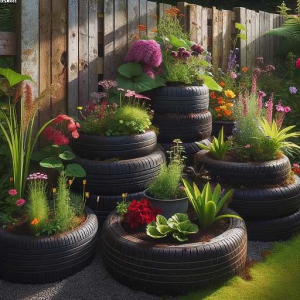
If a strong enough army can be assembled of these little creatures, then chemicals can be kept to a minimum.

Friendly bugs aid a natural balance

Most gardeners and growers are also interested in the rest of the natural world. This goes without saying!

Nature has a wonderful way of balancing things out. Also known as “predator and prey,” So ensuring that things in nature can balance things out Well, this also applies to creatures that can help us in the battle against garden pests. Generally, neither will wipe the other out completely, and so the balance of life is maintained.

One species will outgrow the other and vice versa. The commonest of these is the well-known “ladybird.” The ladybird is also known as the “ladybug” in many parts of the world and is a member of the “coccinellid species”

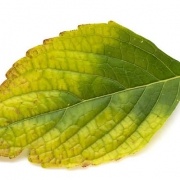
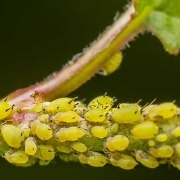
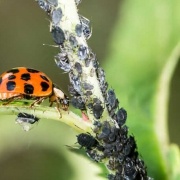
Of course, the ladybird is a well-known devourer of the aphid and scale insect families. These common pests can make a mockery of our new and precious plants. Indeed, many members of the ladybug family will lay their eggs directly in a colony of aphids. thus providing instant food for the developing larvae as the eggs begin to hatch. The world-wide family of the ladybird is huge! with almost 6,000 different members of the species.

Spring ladybird collection days

I often take a glass container with a lid and go out collecting these little creatures on a warm spring day. Luckily, we have some rough land covered in scrub near our local railway line. This is a great place to look for ladybirds emerging from hibernation. The ladybirds frequent the warm, sun-drenched embankments and are easily collected.

On arriving home I let them make their own way out of the glass jar and let them forage for the dreaded aphids. of course to eat!

Here in the UK, we are blessed with about 46 species of ladybirds. all with differing patterns and body sizes. So, these little creatures come in many colours and spots. including red, yellow, orange, and black. When I was a kid, the most common ones were the ones that were red with black spots.

We always thought that the yellow and black ones were somehow poisonous. Hence, keeping well away from them and do not make contact with them. The red ladybird with seven black spots was the most communist, and it’s still around in 2021.

Harlequin ladybird now the most common in the UK-Friendly Bugs-ladybirds

However, a relatively new type of ladybird is now taking over as the number one contender. Known as the “harlequin ladybird,” Unfortunately, the harlequin is killing other popular species. I must admit that there has been an increase in the so called poisonous ladybugs of my childhood.

This particular type of ladybird comes in different disguises. They can be black with red spots to orange with white spots. Fortunately, they all have the same aim in life, which is, of course, to find and eat aphids and their associates.

Incredibly, there is a blue-coloured ladybug! This is known as the “steel-blue ladybird” and comes from Australia and New Zealand. This species is also a voracious eater of scale insects and aphid populations. Particularly beneficial to citrus growers, assisting with the common “scale insect” infections of the fruit crop.

I have seen what I thought was a blue ladybird. However, it was more likely to have been a “blue mint beetle,” which is very similar in size to a ladybird but feed on green vegetation and not aphids.

Hydrostore-botrytis

Botrytis A Quick Look!

Home » Plant pests

Botrytis A Quick Look!

Botrytis A Quick Look!

Most gardeners and growers cringe at the first sight of the dreaded “grey mould,” known as Botrytis cinerea. I do find that the fungus is synonymous with damp, warm conditions. Certain crops are more susceptible than others. Strawberries are the crop that comes to mind, but the dreaded fungus can become a nightmare for all growers. So, this fungus is what’s known as a “necrotrophic” . Of course, that means that the fungus kills the host to get all the nutrients that it needs.

Botrytis will also affect well-known plants grown indoors. attacking weak plants and dying flowers. Importantly, this fungus plays a big part in the natural growth cycle of nature. So, helping to form an important part of the natural breakdown of natural substances. Unfortunately, when it affects your precious plants, it can become a real pest problem.

6 signs of Botrytis

Botrytis, also known as grey mold, is a fungal disease that can affect a wide range of plants, including flowers, vegetables, and fruit trees. Some signs of botrytis infection include:

  1. Brown or gray patches on leaves, stems, or flowers. These patches are often fuzzy or cobweb-like in appearance and may spread rapidly.
  2. Wilting or drooping of affected plants.
  3. Black or brown lesions on the stems or fruit of plants.
  4. Shriveled, rotting, or decayed areas on the plant tissue.
  5. The presence of dark, spores on the affected plant tissue.
  6. A musty or moldy smell emanating from the affected plants.

If you suspect that your plants may be infected with botrytis, it is important to take action to control the spread of the disease. This may involve removing and destroying infected plant tissue, applying fungicides, and practicing good cultural control measures such as avoiding overhead watering and improving air circulation around the plants.

In my experience, the first signs can be seen on your plants in a damp, wet summer! with plenty of sun and rain. Unfortunately, this summer (2021) is such a year. The only thing you can do is keep an eye on your crop for the first signs of the dreaded dark spots.

The plant tissue, usually the leaves, will become darker and softer due to the death of the host plant’s leaves or flowers. Consequently, a furry grey mould will quickly develop on these dark spots.

Spores develop in the air

Unfortunately, the mold is spread by airborne spores. so affecting plants when the weather starts to warm up in the spring. Structures called condias are usually formed from previous years’ infected plants. These are airborne and transported through the air so coming into contact with the host plant’s leaves and other parts of the plant.

If you find that you have the start of an infection, then get rid of the plant parts that are infected. The infected plant parts should be burned if possible or taken as far away as possible for disposal.

I must say, though, that it is very hard to get rid of an infection and that losses are almost certain. This is because the mould sends out clouds of spores onto nearby plants when it is moved. As time passes, the infection spreads.

There are many preparations that claim to prevent botrytis attacks. One that I think is worth trying is prevention by using “BAC foliar spray” on your plants to try and help prevent an attack.

yellowing leaves iron deficiency

Yellowing Leaves

Home » Plant pests

Yellowing Leaves

Yellowing Leaves

So, here in the UK we are at last enjoying some warm sunny weather. Ironically, this is the time to keep your eyes open for the tell tale signs of your plants leaves “yellowing”. Change of climate and temperature is one of the things that can effect your plants and witnessing some of your plants leaves turning a shade of yellow. Importantly, the yellowing of leaves can be signs of many things. Common symptoms include such simple things as too much or too little nutrients, certain viruses, not enough light, the wrong ph for that particular plant, the incorrect watering regime and many more complicated systemic problems. Included in yellowing could also just mean that the plants life is coming to an end and this could be taken in to account.

Lets look at watering

So the technical term is “moisture stress”. Meaning the plants suffering from yellowing leaves are most likely to be the victims of over or under watering. This was always a problem for me when growing in a greenhouse or polytunnel. Ventilation, is a must but there is always times when they do get over heated. Overheating, causes the pots to dry out and therefore puts the plants under stress. Quick response can save the day! However if you are away for a couple for days then you are in trouble. Not only do weak plants attract more pests but they will also start the dreaded yellowing process.

Of course watering will help your plants pick back up but the damage is already done. Weak plants will be the end outcome. Usually with smaller fruit or smaller flowers. In the past I have tried a few things including drippers. However I think that the “Autopot” system and a good sized plastic water tank is the answer. Another yellowing of the leaves can be caused by over watering. This probably applies more on house plants where the plant carer tends to over do things. I have a friend who always lovingly kills every plant that she buys. Accordingly, she waters the plants far too much and eventually the plants turn yellow and eventually die.

Hydrostore-Yellowing Leaves-Where did the yellow begin to show

So, the keen plant grower could determine where the yellow started to effect their plants. Firstly, if the yellow appears at the top of your plant then the problem could be an “Iron Deficiency”. Secondly, if the yellow starts at the bottom leaves of the plant then it could be “Magnesium Deficiency”. Lastly, if the plant appears to be yellowing all over at the same time then it could be a “Nitrogen Deficiency”

So, a good idea is to check out the plants ph level. Of course this is more important with some plants more than others. However it would be well worth checking. Especially if you are have other problems such a slow growth. Many plants require ph that is in the neutral range, but some require more acid. Such plants include the “Azalea” family, requiring a very high ph acid soil. Importantly ph can be adjusted using certain hydroponic products such as “Vitalink Products” .

Another related thing to watch out for is for the grower of certain plants. Hence, if you are in the middle of flowering then it could be wise to make sure you have the correct magnesium levels in your water tank.

To emphasise, the ph levels are important factors when checking the levels. Both in hydroponics and in soil growing methods. The incorrect ph levels will cause slow growth with low yields of flowers or fruit.

Finally , I hope this post gives plant growers some insight into this sometimes common problem. So, yellowing leaves are just a small part that we gardeners and plant growers should be aware of. Also there are treatments at your local hydroponics store.

Grey Mould Problem

Hydrostore-Grey Mould Problem ?

Grey Mould Problem

Home » Plant pests

Grey Mould Problem

Of course the first time that I can remember this problem was when I was rooting my first Chrysanthemum cuttings. Coincidently, it was also in my first greenhouse. Although still a teenager I rented my first allotment which was next door to my local park in Dewsbury ,West Yorkshire. So, I was always careful with my money and indeed had a paper round in the morning and also the evening.

Of course this enabled me to pay the yearly rent on my first allotment. The cuttings were given to me by a vey kind allotment holder who has now passed away. Mr Grimes was also the local council swimming instructor in the Dewsbury area. So, Mr grimes was the king of growing all sorts of things including dahlias and chrysanthemums. My first job was to clear the overgrown allotment area including my newly acquired and rather old greenhouse.

Ventilation became the problem

Grey Mould is technically known as ” Botrytis Cinerea” . Hence grey mould is a type of fungus and can spread very quickly if not spotted early. The mould is more rampant in humid and warm growing conditions. Going back to my youth! Mr grimes kindly gave me a selection of chrysanthemum cuttings to try and root myself. So, the last user of the greenhouse had left some good and useful things including seed boxes and smaller things such as plant labels.

This was all to become useful as money was not available form my parents in those days ! Everything had to be earned. Hence my two paper rounds. After looking up “rooting cuttings” in my old and tattered gardening book. Then I filled two wooden boxes with peat and placed in the prepared cuttings using a good quality peat. This was the main medium that all gardeners used in those days. Most growers now use “Coco” as a growing medium, due to environmental considerations.

However I digress! So my greenhouse was not heated, (because I could not afford) . Consequently, the days were warm and the nights cooler. Unfortunately for me this encouraged the growth of grey mould on my newly acquired cuttings. Eventually, I lost the lot, but this was a lesson learned!

Ventilation was the lesson learned. This old greenhouse had a window that opened but could not now be used because of age. Modern plant growers have a wealth of equipment to stop grey mould from attacking your valuable plants. Whether indoors or in a greenhouse then good ventilation is a must. “Prevention is better than a cure”. Here at Hydrostore we sell a large selection of fans and ventilation extractor fan systems.

Good ventilation the best practice

So, lights and heaters can cause the humidity that grey mould thrives on! My latest greenhouse (fifty years later) has many top openings and side vent systems. Even so I will have an electric fan in place for high temperatures or thundery clammy weather. When growing using hydroponics systems there is a good amount of water involved. So once again good ventilation is a must. In humid conditions the grey mould can spread very quickly.

The mould can also hide on non-growing items just ready to spread into your valuable flowers and fruit. Good cleanliness in the growing area is also a must. As I have mentioned, fans and dehumidifiers are available from you nearest “Hydrostore” here in West Yorkshire.

rrey mould thrives on environments that are to humid and quickly spread from plant to plant and often to non plant items to, its especially common in the very early stages or the d flowering stages if the humidity is to high and you have a lot of dense flowers and fruits that the old loves to hide in. A great product that can be used is “canna cannazym“. Please read the instructions carefully for the best results.

Just as a footnote then grey mould is common on grapes and can be clearly seen on the attached image.

Plant Pests-Whitefly

Plant Pests-Whitefly

Home » Plant pests

Plant Pests-Whitefly

So these little past are the pests that haunts most plant growers, including myself. Of course whitefly come in many different variants. It is estimated that there are about 1500 different species of these little garden horrors.

However one variety is known as the glasshouse whitefly. This garden pest is a sap-sucking pest that attacks your plants. So, at the same time they give off a sticky substance better known as “honeydew” . This honeydew can be seen all over the infestation. Adult whitefly and the nymphs excrete this sticky honeydew on the foliage, which allows the growth of black sooty moulds. This black sooty mould can become a real problem making the plants look totally un-healthy. Ultimately, the leaves, fruit and stems are all targets for these little monsters.

Last year was a particular bad year for whitefly. These little garden enemies thrive in hot summers. Last year was a good year for growers of all types of plants! However I had a particular bad attack of whitefly. Especially on my pepper plants. My peppers were very bushy. So, the first whitefly outbreak was missed . Causing me a much bigger problem and not really catching up with problem. Eventually I had to attack them by removing my peppers outdoors. This gave me the room to attack the whiteflies from every angle. next year I will keep a closer eye on things.

Controls

So one of the favoured “biological” methods is to introduce the tiny parasitoid wasps, Encarsia formosa. Importantly, these enemies of the whitefly must be introduced in the first instance. Giving the wasps time to devour the whitefly nymphs emerging pests. After a successful attack of the nymphs by the parasitic wasps then the results will let you see the nymphs turning black. This turning black will help you monitor the situation of how the wasps are doing.

Importantly, the grower must be careful not to use an insecticide at the same time as introducing the parasitic wasps. Another point is not to use the yellow stick cards when introducing the wasps. Of course, the wasps will also land on the sticky cards. As a general rule then the following precautions will be a great help when battling against these little pests.

As I recommend for most flying insects then the sticky yellow cards must be used. There are other types of sticky cards and all are most useful. These cards help the grower to spot any type of insects at an early stage. After the pests are spotted then the attack against them can be mounted.

Newly introduced plants should be quarantined first before placing the plants in there final growing space. This gives time to allow any whitefly eggs or nymphs to develop and spotted so that action can be taken.

Watch for weeds

Growers should be aware that these insects will also thrive on weed. So good greenhouse housekeeping is imperative. Not allowing weeds to grow will eradicate this from happening.

Sooty moulds that develop in the later stages of a whitefly attack, thrive best in hot and humid environment! So good ventilation is very important.

Finally, good hygiene and cleaning your growing environment including the greenhouse should be carried out every winter. This should include using an “insect fumer” . Another product worth considering is the “Hot shots” vapour pads. These products give off an insecticide vapour that penetrates all the area where the growing takes place.

Plant Pests-Fungus Gnats

Plant Pests-Fungus Gnats

Home » Plant pests

Plant Pests-Fungus Gnats

So one good thing about “Fungus Gnats” is that the adults are visible to the naked eye. I must confess that I am not familiar with these little pests and so m on a learning kerb myself. Perhaps one of the reasons why is because the larvae actually feed on the plants roots including the feeder roots. Of course damage to these feeder roots causes slower growth of the effected plants.

Consequently, this opens up the way for the plants to be effected by bacterial infections. Adult gnats can over winter in cold weather. many other insect pests are destroyed by the old of winter but not these little guys.

Over watering could be problem

So the fungus gnats will invariably feed on plants that have the beginning of root rot. Often caused by the plant grower over watering. The gnats can often be found living in over saturated soil. However , a good watering regime would be the answer. In my experience then beginner gardeners will often over water their plants ! Thinking that more water is better than none. However, this is not so a like most things then practice and disappointments due to dying plants will all come with practice and tolerance.

My advice is always to use sticky yellow pads

Like most things insects the adult gnats will be flying around your greenhouse/conservatory or growing room. Catching the adults as they are flying about will help the grower to identify pests. Including the adult fungus gnats. However fungus gnats can also be seen walking about on your plants as they are not very good flyers. In my opinion we should all use the yellow sticky pads where ever space is available. I use them all the time and its unbelievable what little monsters that you can catch and identify.

Once identified you can take evasive action to get rid of the pests.

Natural organic measures can be used including the addition of parasitic nematodes Steinernema feltiae. Of course, these naturally occurring parasites which are soil born will naturally infect the fungus gnats larvae with bacteria and fortunately, kill them.

IMPORTANTLY, DON’T WAIT UNTIL YOU SEE ADULT FLIES

So like many things in life then “prevention is better than a cure”! here at Hydrostore we can offer any grower a preventative online. The product that we recommend is “Nilnat” . Commercial growers use this products before the crops are infected. Also you can use this if you spot the small black adult walking about close to your growing medium or on the yellow sticky cards.

Plant Pests-Red Spider Mites

Plant Pests-Red Spider Mites

Plant Pests-Red Spider Mites

Home » Plant pests

Plant Pests-Red Spider Mites

So spider mite always come as a shock when spotted. Including a greater shock to new gardeners. Growers of indoor plants are most likely to come across these little monsters. They often cause damage before they are spotted. When look at under a microscope like the above image they truly look formidable creatures. I liken them to some types of aliens from a distant planet.

The plant cells are damaged by these little monsters. Their mouthparts will stick into the plant cell structure and then drain the cells content. Damage caused looks like tiny little speckles on your plant leaves. The leaves are marked yellow and white and very noticeable. So, the leaves will eventually turn a bronze colour and eventually fall off causing the grower much concern.

If infestations are not tackled then your plants will often be covered with horrible looking webs. Eventually, the attack will defoliate the plant and kill it.

Difficult to treat red spider mite

Unfortunately, red spider mite are extremely difficult to spot in the first instance. So, even with us older gardeners, these little red devils are difficult to spot in the first instance. Naturally this gives the mites a little time to establish themselves. So, spreading amongst nearby plants without being spotted.

Secondly, these pests tend to graze beneath the leaves of the plant, keeping hidden away. This has two actions! Firstly, they are difficult to spray under the leaves! Secondly, they are also difficult to find by their natural predators.

Spider mites are fast breeders. Importantly, a new generation can be born every five days in the right conditions. In general the life span of these little pests is about a month. Within this month the females can lay hundreds of eggs each.

Plant Pests-Red Spider Mites

Just like the aphids then the ladybird and the lace wings are probably the best natural way of trying to control the red spider mites. Soap sprays are also a good way of controlling these insects. Spider mites will start a new infestation when the temperature rises in the spring. Temperatures of 25C usually bring them out of winter hibernation. Growers that use artificial lighting to grow all year round are more likely to get attacks and must be vigilant at all times.

Other methods of control include the introduction of predatory mites. Known as “Amblyseius Andersoni” . This variety of mite feeds on pollen and some other species of mite. Slow breeder sachets are available which slowly release the good mites over a three to four week period.

Finally a natural product is also available known as SMC natural control. This works by a physical means blocking the breathing holes of the red mites and insects causing death by suffocation. Incidentally, any spider mite eggs are unlikely to hatch due to their encapsulation within the medium and their obvious inability to transpire successfully into an adult spider mite.

Plant Pests-Starting With Aphids

Plant Pests-Starting With Aphids

Home » Plant pests

Plant Pests-Starting With Aphids

There is no doubt about it that whatever and wherever you grow your plants then sooner or later you will be confronted by these little pasty guys! The dreaded aphids. In fact I have just sprayed some early clusters appearing on my greenhouse on the citrus trees. So, this prompted me to start a series of blog posts about pests and some of the best ways to control them.

What are Aphids ?

Well these little guys are small insects of differing colours. They can be seen in green (the popular I think) grey, black, red, yellow and a few other colour. The bodies are mainly pear shaped and they hang out in clusters of differing sizes depending on how long they are aloud to live. Of course its always a bit disheartening when you spot your fist Aphid outbreak! Especially when you are new to growing plants.

These little horrors can be found on most type of plant both in doors and outside. I our part of the world here in West Yorkshire the aphids are generally know by there colour. So, the green ones are known as “green flies” and the black and grey ones as “black flies”. Importantly though they are all aphids and require controlling in the same way.

So, usually the first sign of an outbreak will be spotted on “new growth leaves”. Aphids will live on the underside of new leaves and suck at the juices of the plant. Both indoor and outdoor plants can be affected, so a close watch should be a part of your plants maintenance. At first the aphids dont seam to have much affect on your young plant leaves. However a bad infestation will lead to the plant leaves dropping off, usually turning yellow first.

Aphids can spread diseases

Aphids can be a huge problem on certain crops. Of course we have all seen the shiny sticky substance they the give off. This is known as “Honeydew”. This sweet excretion is a food of other insects such as ants. Ants will often farm the aphids for their honeydew Thus perhaps causing other problems for the discerning gardener. So, another problem that can manifest itself is that the honeydew is also a food source for moulds. These moulds can often be seen on plants that have not been treated for the aphid infestation. They look unsightly and should be treated as soo as possible. All these things should be part of the plant growers hygiene practises and not neglected. Once you spot aphids then action must be taken ASAP.

Aphids give live birth

Of course this is why these little pests can multiply so quickly. Female aphids give birth to live young. So, as soon they are born then the young aphids are able to start the assault on your plants. After four moulting’s of a white coloured skin then these little guys can start producing more offspring’s. Fundamentally, increasing the size of the infestation with an aphid population explosion. This is why early vigilance and intervention is required by the plant grower, indoors or outdoors. If you see an early outbreak then attack it.

So, the young aphids are known as “nymphs”. This is common in the insect world. The nymphs look very much like the adult insects and can cause the same amount of plant damage accordingly. Aphids can easily spread their colonies to other parts of the plant or garden. This is done by some of the adults having wings. These adults emerge when the local colony is getting too large to sustain.

Aphids natural predators

Like most of the world of natural history then there are natural balances to help eradicate these aphid pests and the powdery mildew that follows. . Of course the most people know of the most popular aphid eater , the “ladybird) or “ladybug ” as it is called in the USA. These predators are a member of the beetles family. In my opinion then the ladybird is a common and welcome site to the regular outdoor gardener. These bright coloured flying beetles are a welcome site and come in any forms and colours. The most common been bright red with black spots.

Ladybirds arrive on this planet in four stages, Firstly the eggs are laid on wild plants such as nettles. The eggs hatch into a larva and quickly develop into the pups and then the adult ladybird emerges into the bright red and yellow dotted beetle that we all recognise. Clusters of up to forty eggs can be seen on the leaves of nettles and other wild plants. Consequently these eggs hatch in about four to ten days.

Ladybirds can be seen hibernating around garden sheds and even in houses. Emerging in spring and soon starting their life cycle over again. These beetle are rampant feeders of aphids and can eat as many as 5,000 aphids in a year.

Here in the UK ladybirds are available to buy. Adults or larvae are available between the months of April to August. Another good organic way of aphid control is from “Neem Oil” . This treatment is derived from the seeds of the tropical “Neem Tree” and can be used as an insecticide and other things such as, aphids, spidermites, mealybugs, and scale. It also controls diseases, such as powdery mildew. This is a beneficial product to have handy for your plants and is available from Hydrostore online.