Phoenix Cactus Haven Visit

Phoenix Cactus Haven Visit

Phoenix Cactus Haven Visit

A Cactus Lover’s Dream: A Tour of Phoenix, Arizona’s Desert Botanical Gardens

Recently, a close friend treated me to a tour of the Desert Botanical Gardens while I was in Phoenix, Arizona. Cacti have always been a favourite of mine, so I was ecstatic. Seeing these interesting desert dwellers in their native habitat was kind of a dream come true for me because I have a tiny but treasured collection of cacti back home in the UK.

Initial Thoughts: An Abundant Sea of Spikes and Green

The size and diversity of the plants are the first things that catch your attention when you walk into the gardens. Although it’s simple to imagine the desert as a desolate, dead area, that couldn’t be further from reality.

A breathtaking exhibit of plants flourishing in the most extreme circumstances may be found at the Desert Botanical Gardens. Saguaros that towered over me and some of which reached over 40 feet into the sky were like desert sentinels as I walked through them. Even people who don’t know much about cacti may recognise them right away thanks to their distinctive arms.

Phoenix Cactus Haven Visit

Examining the Collections: The Finest Cacti

Over 50,000 species are spread throughout five themed trails in the gardens. But naturally, the cacti piqued my curiosity the most. It seemed like being in a living cactus encyclopaedia, from the barrel cacti.Of course, which are robust and spherical, to the prickly pears, which have flat pads and vivid colours.

The golden barrel cactus, with their vivid yellow-green spines that almost seem to sparkle in the sunlight, captivated me for a long time.

Seeing the variety within the cactus family was quite fascinating. The little cactus I have on my windowsill at home has always appealed to me. But seeing these giants made me realise how versatile and different they are.

The Cholla Garden, which was home to the notorious “jumping cholla,” was particularly intriguing. After hearing the terrifying tales of those barbed spines that adhere to your skin at the first sign of contact, I avoided getting too close!

Succulents and Cacti: The Masters of Survival in Nature

Finding out more about how these plants endure in such a harsh environment was one of the highlights. I’m always amazed at how resilient cacti are. They may survive for months without rain because of their thick, meaty stems’ capacity to hold water.

Even in the driest environments, some plants, like the saguaro, may survive for more than 150 years and grow extensive root systems to obtain water.

I also spent some time in the succulent garden, which included plants that retain water in their leaves in addition to cacti. The gorgeous aloe vera plants and agaves, with their jagged, spiky leaves, were breathtaking.

The succulents here made me consider slightly growing my collection, even though I still adore my cacti collection from the UK. After all, they exist in a vast array of shapes and sizes and are equally as intriguing and resilient as cacti.

Phoenix Cactus Haven Visit
Resources for My Collection in the UK

I couldn’t help but feel motivated to attempt to replicate some of this desert beauty at home. As I strolled around the gardens.

Although the UK’s climate is obviously not conducive to desert plants. I’m fortunate that succulents and cacti may flourish indoors, particularly on a sunny windowsill.

I’ve already begun gradually expanding my collection, and I’m resolved to find a few more species after this visit. I also brought back a couple of tiny cacti that I had purchased from the garden’s gift store.

Phoenix Cactus Haven Visit

The Blooming Desert: An Unexpected Vibration of Colour

I was surprised to learn how colourful the desert might be. Cacti are typically thought of as green, prickly plants; however, many of them have the brightest flowers.

The gardens were speckled with pink, orange, yellow, and red hues.

Although I was not fortunate enough to witness one open this time, the night-blooming cereus. So,for instance, produces beautiful white blossoms.

I was reminded by the beauty of these blooms that cacti are full of surprises despite their hard exteriors.

Despite their tough and resilient appearance. They are capable of producing some of the most exquisite and delicate flowers found in the plant kingdom.

Phoenix Cactus Haven Visit
Concluding Remarks: An Essential Stop for Cactus Fans

Anyone who enjoys cacti and desert fauna should visit Phoenix’s Desert Botanical Gardens.

In the midst of the desert, it is a veritable oasis of beauty and knowledge.

For me, it was an opportunity to learn more about the special adaptations and survival techniques. Hence, of these amazing plants in addition to getting a close-up look at them.

I’m already considering how to incorporate some of that desert atmosphere into my own house now that I’m back in the UK.

I’m excited to see where my renewed interest in these spiky plants will lead me. Including my small collection of cacti is expanding!

I strongly advise visiting Arizona if you ever get the chance; you won’t regret it!

cactus seeds

Cacti From Seeds

Cacti From Seeds

Cacti From Seeds

Cacti From Seeds
Cacti From Seeds

A Clear Guide to Growing Cacti from Seeds

One of those peaceful, fulfilling hobbies that allows you to bring a little bit of the desert into your house is growing cactus from seeds. Seeing these intriguing plants grow from small seeds into thorny, sculpture-like plants is an amazing experience. And it’s not as difficult as you would imagine to produce cacti from seeds! All it takes is a little perseverance, careful attention to detail, and excitement. If you’re interested in giving it a go, here’s a step-by-step tutorial to get you going.

Why Plant Seeds for Cacti?

You may ask yourself why you should deal with seeds when you can just pick up a little cactus at the garden centre. The variety and experience hold the key to the solution. Growing cactus from seed allows you to experiment with a variety of species that aren’t usually available in stores. Try experimenting with different cacti’s sizes, shapes, and colours; some may even surprise you with unexpected blooms!

Growing from seeds also has the advantage of being somewhat more cost-effective, particularly if your goal is to amass a collection. More than anything, though, is the joy of seeing them develop from a tiny bit of dust into a mature, spiky beauty. The payoff is certainly worth the wait if you’re patient.

Cacti From Seeds
Cacti From Seeds

Starting Out: Essential Items

You should gather the following essentials before getting started:

  1. Cactus seeds: specialised nurseries or the internet carry a wide assortment of cactus seeds. You can experiment with uncommon species or start with beginner-friendly varieties like Echinopsis or Mammillaria.
  2. Tiny pots or seed trays: Verify that the pots contain openings for drainage.
  3. Cactus potting mix: You can make your own by combining ordinary compost, sand, and perlite with garden centres to form a soil that drains properly.
  4. Plastic bag or clear cover—to maintain a high humidity level throughout germination.
  5. Small pebbles or fine grit—to aid in drainage and gently cover the seeds.
  6. Spray bottle: This is for light misting.
  7. Detailed Instructions for Growing Cacti from Seeds

1. Get the Seed Tray ready.

First, add cactus soil mix to your pots or seed tray. Cacti like soil that is well-draining and airy, so even while it should be level, avoid compacting it excessively. Here a delicate touch is ideal.

Sow the Seeds #### 2.

Because cactus seeds are so small, handling them should be done carefully. Just disperse the seeds uniformly over the soil’s surface. Avoid burying them too far down! In fact, because they require light to germinate, several types of cacti actually prefer to be kept uncovered. For others, just a very little dusting of fine grit or sand is sufficient.

3. Establish the Proper Setting

Because cacti prefer warm, humid environments, keeping the humidity in your seed tray can be achieved by covering it with a plastic bag or a clear plastic lid. The tray should be placed in bright, indirect light and in a warm area (around 20 to 25 °C). The young seeds are a little delicate at this point, so avoid placing them in full sunlight.

4. Watering

There are some differences between watering mature plants and cactus seeds. Use a spray bottle to lightly sprinkle the soil rather than completely submerge it. The surface should remain somewhat damp but not drenched. Make sure to often check the moisture content, particularly after the seeds begin to sprout.

5. Remain patient.

The waiting game is about to begin. While some cacti seeds sprout in a matter of weeks, others could take months. Tiny green sprouts will begin to poke their way through the ground. Avoid disturbing them too much and keep the atmosphere warm and damp.

6. After Germination

After emerging, it’s critical to progressively acclimatise the seedlings to drier conditions. By gradually increasing the exposure, you can achieve this by removing the plastic cover for a few hours each day. You can allow the soil to dry out a bit more in between mistings as the cactus get bigger.

7. Transplanting

Since cacti grow slowly, it’s not advisable to repot them too quickly. When they are large enough to handle, which may take six months to a year, carefully move them into separate pots filled with new cactus soil. Because cactus don’t require much space to grow in their early years, make sure the pots are modest.

Success Suggestions

Light: The cactus will require an abundance of light once they are established. A bright windowsill is ideal, but keep young plants out of direct sunlight since it might scorch them.

Climatic temperature: Although cacti prefer warmth, once they reach maturity, they can tolerate rather chilly temperatures. When they’re little, try to provide a warm, steady environment for them.

Resilience: Recall that cactus growth is slow. Unless you’re the type of person who needs things done right away, cultivating cactus may need some patience. Still, there’s something charming about the slower growth!

Typical Traps to Avoid
  • Overwatering: Among the most frequent errors is overwatering. Cacti require extremely little water, particularly in the winter when they are dormant. Rot and other issues might result from overwatering.
  • Insufficient Lighting: Young seedlings require lots of light to flourish, even if they don’t require direct sunshine. Put them in a light area to ensure they are getting enough.
  • Irritation: Avoid the need to move or disturb your cacti too soon. Since they grow slowly, it’s better to leave them alone during their formative years.

Final Reflections

One of the best ways to bring a little bit of the raw beauty of nature into your house is to grow cactus from seeds. Even while it could require some effort and time, the process is really fulfilling. Starting from seeds is a great approach to interacting with these fascinating plants, whether your goal is to cover your windowsills with spiky beauties or you just want to appreciate the process of developing something unique.

With the correct circumstances and a healthy amount of perseverance, you’ll soon have an impressive collection of flourishing cacti!

Rediscovering My Passion for Cacti Growing

Rediscovering My Passion for Cacti Growing

Rediscovering My Passion for Cacti Growing

Rediscovering My Passion for Cacti Growing

My Passion for Cacti Growing

After much thought I have decided to use my greenhouse for a new cactus collection.I have found it difficult to maintain my lemon trees in recent years. Lemons require alot of attention and I had more important things to do in my life. However thats now in the past. So I have decided to rekindle my love of cacti.

I will utalise my greenhouse for a new collection of cacti starting in the spring of 2025. Winter is almost upon us and I need to clean and sterlise the greenhouse before any cacti are introduced. I have other things going on in my life at the moment so I will slowly cary this work out over the winter period ready for spring.

As the years roll by, life tends to go through its phases,?

When my children were young, my love for cacti was something I had to put on the back burner. Cacti, as most of you probably know, can have some pretty fierce spines, and I wasn’t keen on having little fingers exploring those sharp prickles!

The last thing I wanted was for my youngsters to come running in with a cactus spine in their hand, so for years, I steered clear of collecting these fascinating plants.

But now, with the kids all grown up and having flown the nest

I find myself in a different phase of life—one where I can reignite some old passions. One of those passions is, without a doubt, cacti! I’ve always found them to be such intriguing plants. Their resilience, the way they adapt to harsh conditions, and their unusual shapes and textures always caught my attention.

Now, with more time on my hands and no worries about tiny hands reaching into spiny territory, I’ve been slowly building up a collection again. And I have to say, I’m loving it!

Rediscovering My Passion for Cacti Growing

Why Cacti?

I think what first drew me to cacti was their sheer toughness. These plants are survivors. They thrive in some of the most extreme environments, with minimal water and maximum sun—qualities that I find oddly admirable. There’s something very rewarding about watching a cactus flourish with just a bit of care, patience, and the right amount of light.

And let’s not forget their unique beauty! From tall, spiky giants to small, rounded varieties covered in soft fuzz, there’s such diversity in the cactus family. Some bloom with the most incredible flowers, offering bursts of colour you wouldn’t expect from such prickly plants.

Safety First!

Of course, cacti do come with a bit of a health warning! Their spines can range from tiny, hair-like needles that are tricky to remove, to long, sharp spikes that can give you a nasty jab if you’re not careful. I wasn’t taking any chances when my children were small. But now, with no toddlers racing around, I can afford to give them a home on my windowsill once again.

Having a renewed focus on cacti means that I can take my time to properly research the different species and figure out the best ways to care for them. My latest additions are thriving, and I’m thrilled to have the chance to dig into this hobby once more.

Rediscovering My Passion for Cacti Growing
Looking Ahead

Now, I’m not just stopping at a few plants! With my children grown and independent, I can dedicate more space to growing my collection, my greenhouse. I’m excited to try my hand at propagating, and I’m keeping my eye out for some of the more unusual varieties to add to my collection. It’s funny how something you set aside years ago can make such a big comeback in your life when the time is right.

If you’ve ever been interested in cacti but worried about the safety side of things, I can totally relate. But once the kids are a bit older, or if you’ve got a house without little ones around, cacti can be an incredibly rewarding and low-maintenance addition to your plant collection.

Now, if you’ll excuse me, I’m off to find a new spot for the latest addition to my cactus family! Southfield Nurseries


Cacti My New Interest

Cacti My New Interest

Cacti My New Interest

Cacti My New Interest

Discovering the Charm of Cacti: A New Obsession for a Keen Gardener

As someone who’s always had a passion for gardening, I’ve dabbled in everything from vegetables to flowering shrubs, but one group of plants has largely escaped my notice—until now. Enter cacti, those prickly, resilient wonders of the plant world. It might seem odd, but despite their reputation for being tough desert dwellers, cacti make incredible houseplants, especially when displayed proudly on a kitchen windowsill.

Why Cacti?

For years, I’ve been drawn to traditional outdoor gardening, but I never paid much attention to houseplants, especially cacti. However, once I took a closer look, I realised that cacti offer something truly special. Their sculptural forms, wide variety of shapes, and low-maintenance lifestyle make them perfect companions for indoor spaces.

Cacti belong to the succulent family, meaning they store water in their thick, fleshy tissues, allowing them to survive in some of the harshest conditions on Earth. But the beauty of these plants isn’t just in their survival skills—it’s in their aesthetic appeal. Whether you prefer the spiky look of a golden barrel cactus or the architectural elegance of the tall and slender Euphorbia, there’s a cactus for every taste.

Cacti My New Interest

The Perfect Kitchen Companion

One of the best places to grow cacti indoors is the kitchen windowsill. Kitchens are usually bright, well-lit areas, which is ideal for these sun-loving plants. Cacti thrive in bright, indirect light, so a windowsill that gets a lot of sunshine but not too much scorching direct sunlight is perfect. They not only add a touch of nature to your space but also give a minimalist, modern feel to your décor.

Plus, cacti don’t mind a bit of neglect! Unlike some of the more temperamental houseplants, cacti can handle a missed watering or a bit of dust. In fact, they often do better when left alone.

Cacti My New Interest

Basic Cactus Care

Despite their tough exterior, cacti do need a bit of attention now and then to keep them happy. But don’t worry, they’re not fussy—just a few simple tips can make all the difference.

1. Watering
The key to cactus care is proper watering. These plants are built for drought conditions, so overwatering is one of the biggest mistakes you can make. The golden rule is to water them sparingly. During the warmer months (spring and summer), give your cactus a good soak about once every two to three weeks, allowing the soil to dry out completely between waterings. In the winter, you can stretch this to once a month or even less. Cacti don’t need much water when they’re not actively growing.

2. Light
Cacti love the light! Place them on a sunny windowsill, preferably facing south or west for the best results. However, be mindful of the intensity of the sunlight—too much direct sunlight, especially in the summer, can scorch the plants. If you notice any signs of browning or shrivelling, move them slightly away from the window.

3. Soil and Potting
Good drainage is essential for cacti. They hate sitting in water, so a well-draining potting mix is a must. You can buy cactus-specific soil mixes from garden centres, which are usually a blend of sand, perlite, and regular potting soil. Make sure your cactus is in a pot with drainage holes to prevent water from accumulating at the bottom.

4. Fertilising
While cacti don’t need much food, giving them a little boost during the growing season (spring and summer) can help them thrive. Use a diluted cactus fertiliser once a month. In the colder months, when the plant isn’t growing as actively, you can skip this altogether.

Cacti My New Interest
Starting Your Own Collection

Today I am visiting Abbey Brook Cactus Nursery in Matlock, Derbyshire. Once I started, I quickly discovered how addictive cactus collecting can be. There’s something about their hardy nature and quirky shapes that makes each one feel unique. From small, spherical varieties like the Mammillaria to the grand, branching Cereus, there’s an endless variety to explore. I now have several on my kitchen windowsill, each with its own distinct character.

In a way, cacti remind me of the wisdom that comes with gardening in general—patience, resilience, and the joy of watching life take root in unexpected places. If you’re looking for a low-maintenance but rewarding way to bring a little greenery into your home, I highly recommend giving cacti a go. Trust me, once you start, you’ll be hooked!

Decking Renewal Wedding Gift

Decking Renewal Wedding Gift

Decking Renewal Wedding Gift
New decking replacing the old decking

Decking Renewal Wedding Gift

A Decking Story: The Gift That Grew

About twenty years ago, I embarked on a little project that ended up being one of the most meaningful gifts I’ve ever given. It all started with Ryan Linton, one of my dedicated staff members, and his lovely wife, Claire. At the time, they were newlyweds, and as a gesture of appreciation (and a bit of celebration), I decided to build them a garden decking area. Now, this wasn’t just any ordinary deck—this was a labour of love.

I laid the decking myself, making sure it was just right.

Decking Renewal Wedding Gift
baby palm trees 20 years later

It had to be a space they could relax in, entertain, and enjoy their garden for years to come. As part of the design, I planted a couple of Australian cabbage palms to give the space a bit of flair and character. I thought, what could be better than something that not only looks great but also grows and thrives over the years, much like their marriage?

Fast forward to today, and that decking has seen a lot. Barbecues, family gatherings, late-night chats, and all the wear and tear that comes with two decades of British weather. To my surprise, Ryan recently decided it was time to replace the decking with some fresh new wood. The fact that it lasted as long as it did was a testament to the care they put into it, but even the best decks need a refresh after twenty years.

Decking Renewal Wedding Gift
20 year old Australian palms
Ryan’s done a fantastic job with the new decking.

He’s clearly inherited some DIY skills along the way, and the space looks as stunning as ever. What’s even more remarkable is how those Australian cabbage palms I planted all those years ago have grown. They’ve become a focal point in the garden, towering and lush, adding a real sense of life to the space.

It’s moments like this that remind me why giving someone a personal gift can mean so much. Sure, it was just a decking area at the time, but it’s grown into something far more significant—a backdrop to twenty years of memories, laughter, and love. And let’s be honest, it’s probably the best wedding present I’ve ever given!

Here’s to the next twenty years of that decking and those magnificent cabbage palms standing tall in the Linton garden.

Planting out a wall garden

Planting out a wall garden

Planting out a wall garden
A well planted wall garden

Planting out a wall garden

My interest in the wall geardens came from the beautiful gardens that stuck in my mind as a child growing up here in Yorkshire. Importantly, every year, we would go on a school trip either to the Yorkshire dales or the Lake District. Happily, I will never forget the beautiful cottage gardens that adorned most village gardens in this part of the world.

Subsequently, these school trips set a precedent and an interest in gardening that would stay with me for the rest of my life. Consequently, because of these trips, I have a complete love of nature and all wildlife. Beautiful walls were planted with spring-flowering plants that cascaded from the top of the small garden walls. My first love was for the vibrant purple flowers of Aubretia. Probably one of the first plants to flower. Naturally, sedums were also popular and seemed to prosper in the dry and well-drained conditions of the walls.

Moving forward forty odd years, I decided to build a low wall down the length of my drive here in Mirfield, West Yorkshire. The wall had two purposes ! The first was to stop delivery cars and vans from turning on my lawn. The second was to create a wall garden.

The twin walls were filled with top soil mixed with fine gravel for good drainage and planted with many alpine plants. I then topped the plants with small pieces of gravel for drainage.

The Best Plants for Your Wall Garden: Embrace Vertical Gardening

Vertical gardens, also known as wall gardens, are an excellent way to add some greenery to cramped areas. These vertical gardens can turn any area into a verdant sanctuary, whether it’s a little patio, a balcony, or just a lifeless wall that needs some greenery. They’re also ideal for those of us who have little garden space and live in cities. Now let’s explore some of the top plants that can be grown in UK wall gardens.

1. Ferns: The Timeless Option- Planting out a wall garden

For wall gardens, ferns are a good choice, especially in partially or completely shaded areas. Their tiny fronds give the scene a lush, textural quality. For vertical planting, fern varieties such as Maidenhair Fern and Hart’s Tongue Fern work particularly well. They can withstand the colder UK environment and grow best in soil that is wet and well-drained.

2. Succulents: Beauties with Minimal Upkeep

Succulents require very little upkeep and are perfect for sunny areas. Their many hues and forms can combine to produce a powerful visual impact. Think about the hardy Sedum (Stonecrop) and Sempervivum (Houseleeks), which are ideal for wall gardening. They are ideal for busy gardeners because they don’t need much irrigation and can survive dry circumstances.

3. Herbs: Useful and Decorative– Planting out a wall garden

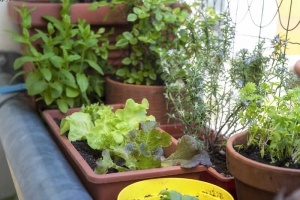
Why not have both elegance and practicality? Herb gardening is a very clever idea for your wall garden. They look fantastic, and you’ll always have fresh herbs on ready for cooking. Great options are Thyme, Oregano, Parsley, and Basil. They adore sunlit areas and soil with good drainage. An added plus is the scent they bring to your garden.

4. Cascading Greenery: Trailing Plants

When trailing plants fall and create a waterfall of green in your wall garden, it can create a stunning impression. Ivy (Hedera helix) is a traditional option, but be careful—it may get rather rambunctious. Other great choices with soft petals and lush foliage are Bacopa and Lobelia.

5. Vertical Veggies: Edible Plants– Planting out a wall garden

In your wall garden, you can indeed produce veggies! Vertical gardens can be a great home for strawberries, lettuce, and spinach, as well as cherry tomatoes. Ensure that they receive frequent watering and lots of sunlight. Vertical food gardening is not only very space-efficient but also quite satisfying.

6. Blooming Plants: Vibrant Pop of Colour

Think about using plants like Begonias, Petunias, and Geraniums to provide a splash of colour. These floral plants may infuse your space with joy and are ideal for wall gardens. Particularly, begonias thrive in shaded areas, while petunias and geraniums prefer sunny settings.

7. Moss: The Carpet of Nature

Moss may be a fantastic addition to your wall garden for its distinctive and organic appeal. It needs very little care and grows best in moist, shady locations. You can cover the surface of your vertical garden with Cushion Moss and Sheet Moss to provide a soft, green backdrop for other plants.

Advice for a Successful Wall Garden

  1. Select the Correct Structure: Make sure the framework is strong enough to hold the weight of the soil and plants. Repurposed pallets, pockets, or even vertical planters can be useful.
  2. Think About Irrigation: Make sure your plants—especially the taller ones—get adequate water. For wall gardens, drip watering systems can be really helpful.
  3. Light and Positioning : Take note of your plants’ light needs. Place plants that prefer shade lower on the stem or in shady regions, and plants that prefer sun higher on the stem or in sunny spots.
  4. Soil and fertiliser: To maintain the health and prosperity of your plants, use high-quality potting soil and give slow-release fertilisers some thought.
Final Thoughts

In my opinion, wall gardens are a creative way to incorporate nature into your life, regardless of how small your space is. They’re not merely a space-saving option. In my life, I have seen many tiny gardens with well-planted boundary walls. Many different types of plants can flourish in twin wall and vertical gardens, including bright flowers, delicious herbs, and hardy succulents, in addition to lush ferns. Now get your gardening gloves on, roll up your sleeves, and begin turning those barren walls into colourful, living works of art.

Cheers to your successful gardening!

Bananas in West Yorkshire

Bananas in West Yorkshire

Bananas in West Yorkshire

Bananas in West Yorkshire

UK Banana Tree Growing

Introducing Tropical Treats to West Yorkshire Gardens

You’re not alone if you’ve ever dreamed of relaxing in your West Yorkshire garden. Surrounded by lush tropical vegetation. Of course, while drinking a cocktail topped with bananas, bought from the local shop, you tried to grow yourself. Although they may seem like an exotic dream for our temperate environment, banana plants can be grown successfully in the UK with the proper variety and a little bit of know-how.

Unfortunately, we do not have a long enough growing period here in West Yorkshire before the first frost comes along and cuts them down.Of course, they look very sad with their blackened leaves sagging to the garden floor.

Selecting the Appropriate Type-Bananas in West Yorkshire

It’s important to select a banana cultivar that can withstand the British weather before you start planting. Seek out hardy varieties like as ‘Musa basjoo‘ or ‘Musa sikkimensis,’ as they may withstand our milder winters with appropriate safeguarding. In the UK, these types won’t usually bear edible fruit outside, but their tropical leaves will still give your garden a visually arresting, exotic atmosphere.Naturally, this is all the gardeners in the north of England can hope for.

Starting Out: Site Selection and Planting

Banana trees do best in warm, protected areas that receive lots of sunlight. In your garden, pick a sunny place that faces south so they may enjoy the sun’s rays all day long. They also require soil rich in organic content and well-drained, nutritious soil. If you have a lot of clay in your soil, you might want to try adding grit and compost to improve drainage and fertility.

Make sure the planting hole is bigger than the banana plant’s root ball. Make sure the soil’s surface is level with the top of the root ball. Cover the base with mulch to help keep moisture in and keep weeds at bay.

Bananas in West Yorkshire
How to Maintain Your Banana Tree-Bananas in West Yorkshire

Watering: Regular watering is necessary for bananas, especially in dry seasons. Make sure the soil is constantly damp but not soggy.

Feeding: To encourage healthy growth, fertilise your banana tree on a regular basis during the growing season with a balanced fertiliser.I prefer to mulch them well with some old-fashioned, well-rotted horse manure.

Protection: To keep your banana tree safe from frost during the winter, if the banana is a pot plant, cover it with horticultural fleece or temporarily relocate it inside a greenhouse or conservatory. When grown outside, the plant’s crown should be well covered with a thick layer of dead leaves or horse manure; even straw would be ideal.

Pruning: To keep your banana tree looking neat and healthy, remove any dead or damaged leaves on a regular basis.

Mirfield, West Yorkshire

Where creativity and gardening skills are deeply ingrained, cultivating banana trees lends a whimsical beauty to our surroundings. Just think of the talk-starter your banana tree may be—a unique twist for our northern environment and a tribute to your horticultural prowess.

In a long summer, we should see a large red flower developing. Followed by a bunch of tiny bananas. However, our season is never long enough for the bananas to develop and ripen fully.

In summary

Although cultivating banana trees in the UK involves some work and consideration for our particular weather, the benefits are substantial. Bananas may offer a flavour of the exotic to Mirfield, whether your goal is to create a lush tropical paradise in your garden or you just appreciate the challenge of cultivating something unexpected.

Accept the challenge of gardening, give your banana tree proper care, and who knows? Your next garden party might just have a distinctively Bananas in West Yorkshire touch of the tropics. Cheers to growing bananas and dreams in this colourful part of the Earth!

Growing Olive Trees in Yorkshire

Growing Olive Trees in Yorkshire

Growing Olive Trees in Yorkshire
This olive tree lost all its leaves this winter and is struggling to survive ?
Growing Olive Trees in Yorkshire

Growing Olive Trees in Yorkshire

UK Olive Tree Production:

A Touch of Mediterranean in your Yorkshire garden

Growing olive trees could be the answer if you’ve ever wanted to add a little Mediterranean sunshine to your Yorkshire garden here in the UK. Although olives are associated with nations such as Italy and Greece, it is quite feasible to grow these hardy trees here in Britain, including in Mirfield, where I enjoy my gardening.

Selecting the Appropriate Type

It’s important to select the appropriate olive variety for our relatively cooler climate before you get your hands dirty. For gardens in the UK, varieties like as ‘Arbequina’ and ‘Picual’ are perfect because of their reputation for withstanding warmer temperatures. If given the proper care and attention, these trees can flourish in addition to surviving.

Starting Out: Site Selection and Planting

Let’s go on to the details. Olive trees require sunshine to thrive, so locate them in a sunny area of your garden where they can get it all day. Additionally, they like well-drained soil, so if your soil is clay-like or heavy in general, you might want to add some sand or grit to help with drainage.

Dig a hole that is somewhat bigger than the tree’s root ball when planting. Planting the tree a little above ground level can help avoid water collecting around the base, which can lead to root rot, which is really bad news for our olive buddies.

Taking Good Care of Your Olive Tree

It’s time to consider maintenance once your olive tree has established itself. Once established, olives require very little care, which is one of their many wonderful qualities. Here are some pointers to keep them content:

Watering: Young olive trees require regular irrigation, especially during dry seasons, while mature plants can withstand periods of drought.

Feeding: To promote healthy growth and fruiting, fertilise your olive tree with a balanced blend in the spring.

Pruning: In order to maintain the shape of your tree and promote fruit output, pruning is necessary. When there is no longer a chance of frost, try to prune in late spring or early summer.

Protection from frost (something I have never considered) Although olive trees are hardy, young trees may require protection from the cold. During especially cold temperatures, bring them inside or wrap them in horticultural fleece.As I have said, I haven’t done this yet ! However, my five olive trees have all lost all their leaves during the last 2024 winter. Possibly because we had long cold spells.

This is the second time they have done this! I may think about not pruning them like I always do after the summer growth. Incidentally, they always grow a full head of leaves during the summer months.

How to Gather Your Own Olives (if your lucky !)

The exciting part is about to begin: gathering your own olives! Olives ripen in the UK, typically in October. When their colour changes from green to a purplish-black hue, you will know they are ready. Harvest by hand with caution, then savour the results of your effort.

This is something that has never happened to me yet. As a result, I believe that your chances of flowering and then berries increase the further south you live in the UK.

A Small Dollop of Regional Character

Grown here in Mirfield, a town renowned for its hard work ethic and breathtaking scenery, olive trees may give your yard a hint of the exotic. Imagine sipping tea on your lawn in the shade of olive trees that remind you of sunny Mediterranean vacations. It’s a lovely contrast that combines the appeal of the world with local tenacity.

In summary

Thus, cultivating olive trees in the UK can be a fulfilling experience for everyone interested in taking on new tasks, regardless of gardening skill level. It’s an opportunity to reconnect with nature, delight your senses, and maybe even show off your gardening skills to your neighbours. A Mirfield olive grove of your very own could be within reach with a little perseverance, love, and care. Let’s toast to infusing our British gardens with a hint of the Mediterranean!

Unusual Things as Planters

Unusual Things as Planters

Unusual Things as Planters
Things as Planters

Tyre Things as Planters

Unusual Things as Planters

Inventive Planters & Garden Ornaments: From Log Burning Stoves to Old Tyres


Greetings, fellow horticulturists and garden aficionados! I can’t wait to explore the incredibly creative world of planters and garden accessories today. A lovely garden is an artist’s canvas, and nothing compares to putting your own stamp on it with some unusual and eccentric garden accents. Let’s investigate how commonplace items can become the focal points of your garden, from the conventional to the unusual.

  1. Old tyres
    To begin with, vintage tyres are a classic. These amazing rubber objects are great for bringing some colour and originality into any yard. You can create visually striking planters for flowers and herbs by painting them in vibrant, upbeat colours and stacking them.
  2. They work very well to build raised vegetable gardens. Not only are they adaptable, but recycling old tyres also benefits the environment—talk about a win-win situation!
  3. Boots Wellington
    Let’s talk about those vintage Wellington boots next. Why not transform them into adorable planters instead of throwing them out? Just add potting soil to them and plant your favourite tiny shrubs or flowers. They hang on fences or can just sit quaintly beside your garden path, adding a wonderful, whimsical touch to any landscape.

Try any old thing ?

  1. Broken teacups and ceramic pots
    Why not use cracked teacups and ceramic pots for a hint of elegance? For tiny plants, such as succulents, these can be excellent. Arrange them in a cluster for a charming, cottage-garden aesthetic. Every pot or cup has the potential to transform into a tiny garden scene, telling a tale in every garden nook.
  2. Wooden Pallets and Crates
    Pallets and wooden crates are very popular because of their rustic appeal. You can paint them to fit the theme of your garden or use them just as is. As your garden develops and changes, crates make great modular planters that can be stacked and reconfigured. Vertical gardens made from pallets are ideal for people with limited space.
  3. A vintage wood-burning stove
    Finally, an antique log-burning stove is a personal favourite of mine that I have had the pleasure of experimenting with in my own garden.
  4. Repurposed as a planter, this strong, solid building boasts a bright array of flowers and ivies that burst out of its open door, adding a rustic yet endearing touch. It is the ideal year-round focal point for the garden because of its sturdy construction that withstands the weather.
  5. Bicycles: You may make eye-catching garden ornaments out of old bicycles. Use the basket and even the frame as planters when you park one in your garden. This gives it a creative twist and will definitely pique visitors’ interest.
  6. Sinks and Bathtubs
    Lastly, we shouldn’t ignore the outdated washbasin or bathtub. These can be used to create substantial, long-lasting planters that are ideal for a range of plants, including dense ferns and an entire herb garden. They also pay homage to traditional English garden design, fusing practicality with a retro aesthetic.
From tyres to log-burning stoves

every one of these objects may be used to design a garden that not only bursts with colour but also narrates a tale of inventiveness and recycling.

So why not have a peek around

to see what you might be able to incorporate into your next landscaping project? It all comes down to appreciating the beauty of the vintage and giving it a fresh use in your outdoor haven. Cheers to your successful gardening!

Cherry Tomatoes

Cherry Tomatoes

Cherry Tomatoes

Cherry Tomatoes

The Cheeky Cherry Tomato

A Bite-Sized History and Its Soaring Popularity


Hello, garden lovers and food enthusiasts! I must confess that I have never been a lover of cherry tomatoes. I prefer the beefsteak varieties. Today, we’re going into the colourful world of cherry tomatoes, those brilliant tiny bursts of joy that have spiced up our salads and snacking habits. Ever wondered how these small tomatoes got to be a mainstay in our kitchens? Let’s study their unique history and find out why they’ve become such a favourite in our diets.

A Tiny Discovery


Cherry tomatoes can seem like a contemporary innovation, but their roots run deep. The story begins in South America, where all tomatoes originate. Wild variants of these small tomatoes have been sprouting up for ages, but it wasn’t until the 20th century that the cherry tomato as we know it started to take shape.

It was in Israel in the 1970s that the cherry tomato was perfected and popularised. Agricultural experts in Israel produced a sweeter, hardier more flexible type that could survive in the Mediterranean climate. This new breed was an instant hit, rapidly spreading across Europe and beyond, even here in the UK.

Why So


What makes cherry tomatoes make a continuous appearance in our shopping carts today? Here are a few juicy reasons:

Bursting with Flavour: Cherry tomatoes pack a huge punch in the flavour department. They’re sweeter and tangier than their larger siblings, making them excellent for a quick snack or to spruce up a salad.

Convenience at Its Best: Their small size makes cherry tomatoes exceedingly convenient. No need to chop or prepare—just give them a wash, and they’re ready to eat. They’re the ultimate grab-and-go veg!

Freedom in the Kitchen:

Whether you’re tossing them in a salad, roasting them to bring out their sweetness, or dropping them into a lunchbox, tomatoes are wonderfully flexible. They can also be cooked to make a quick pasta meal or add a vivid touch to a cheese table.

Healthy Tiny Packages

Cherry tomatoes are not just delectable; they’re also filled with vitamins A and C, calcium, and potassium. They’re a guilt-free snack that helps overall health.

A Nod to Our Local Charm


Here in the UK, cherry tomatoes have been received with open arms. Not only do they bloom in our rather variable climate, but they also give a pop of colour to our cuisine during those grey, cloudy days. If you’re visiting a farmers’ market or a local vegetable stall, you’ll typically find a rainbow of tomatoes, from the deep reds to brilliant yellows and even rich purples. Each kind lends its own particular flavour and charm to the table.

For those passionate on gardening,

These little tomatoes are also a terrific alternative for growing at home. City people and those with little space can grow them in pots on balconies or in little garden patches.

Close

These tomatoes have had a long and delicious journey from their lowly origins on the South American vine to the high-tech farms of Israel and onto our plates here in the UK. A modern favourite, they combine style, convenience, and adaptability. Remember, therefore, that when you bite into one of these tiny red jewels, you’re experiencing a global culinary classic as well as a piece of agricultural innovation. Whether you’re dressing up your salads, nibbling on the go, or learning about the home kitchen, whether wonderful or tart, cheers!